HP P4000 9.0.01 HP P4800 G2 SAN Solution for BladeSystem Maintenance Guide (BV - Page 22
Replacing a storage blade, WARNING, IMPORTANT - lost disk
 |
View all HP P4000 manuals
Add to My Manuals
Save this manual to your list of manuals |
Page 22 highlights
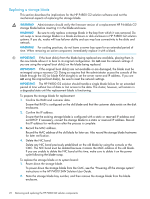
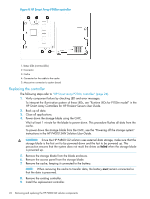
Replacing a storage blade This section describes the implications for the HP P4800 G2 solution software and not the mechanical aspects of replacing the storage blade. WARNING! Administrators should verify the firmware version of a replacement HP P4460sb G2 storage blade before inserting it in the blade enclosure. WARNING! Be sure to only replace a storage blade in the bay from which it was removed. Do not swap or move storage blades in a blade enclosure or disk enclosure in HP P4800 G2 solution systems. If you do, nodes will lose failover ability and you may lose connectivity to the disks and network. WARNING! For cooling practices, do not leave a server bay open for an extended period of time. When removing an active component, immediately replace it with a blank. IMPORTANT: If the boot disk(s) from the blade being replaced are available, placing them in the new blade allows it to boot to its original configuration. Do not reset the network settings if you are using the original boot disk(s) on the blade being replaced. IMPORTANT: If the original boot disk(s) are not available or are damaged, the blade must be re-imaged using a recovery CD. Doing so requires that the administrator access the console of the blade through the iLO (or blade KVM dongle) to set the server name and IP address. If you are not using the original boot disk(s), be sure to reset the network settings. IMPORTANT: The HP P4800 G2 solution should handle a single blade failure for an extended period of time without loss of data or lost access to the data. The cluster, however, will remain in a degraded state until the replacement blade is functioning. To prepare the storage blade for replacement: 1. Confirm the RAID and customer data. Ensure that RAID is configured on the old blade and that the customer data exists on the disk enclosures. 2. Confirm the IP address. Ensure that the existing storage blade is configured with a static or reserved IP address and not DHCP. If necessary, convert the storage blade to a static or reserved IP address. Record this IP address for verification after the process is complete. 3. Record the MAC address. Record the MAC address of the old blade for later use. Also record the storage blade hostname for later verification. 4. Delete the NIC bond. Delete any NIC bond previously established on the old blade by using the console or the CMC. The NIC bond must be deleted because it retains the MAC address of the old blade. If you are unable to delete the NIC bond at this time, make sure to delete it on the power cycle following the blade swap. To replace the storage blade or its system board: 1. Power down the storage blade. To power down the storage blade from the CMC, see the "Powering off the storage system" instructions in the HP P4000 SAN Solution User Guide. 2. Note the storage blade bay number, and then remove the storage blade from the blade enclosure. 22 Removing and replacing the HP P4800 G2 solution components
-
 1
1 -
2
-
3
-
4
-
5
-
6
-
7
-
8
-
9
-
10
-
11
-
12
-
13
-
14
-
15
-
16
-
 17
17 -
 18
18 -
 19
19 -
 20
20 -
 21
21 -
 22
22 -
 23
23 -
 24
24 -
 25
25 -
 26
26 -
 27
27 -
28
-
29
-
30
-
31
-
32
-
33
-
34
-
35
-
36
-
37
-
38
-
39
-
40
-
41
-
42
-
43
-
44
-
45
-
46
-
47
-
48
-
49
-
50
-
51
-
52
-
53
 |
 |