HP P4000 9.0.01 HP P4800 G2 SAN Solution for BladeSystem Maintenance Guide (BV - Page 26
Replacing the SAS switch, Replacing a SAS cable, Open the HP Virtual SAS Manager.
 |
View all HP P4000 manuals
Add to My Manuals
Save this manual to your list of manuals |
Page 26 highlights
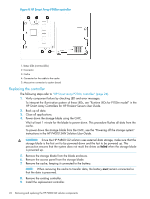
Replacing the SAS switch This section provides instructions for removing and replacing the SAS switch in the HP P4800 G2 solution. CAUTION: Before replacing the SAS switch, be sure to power down the HP P4460sb G2 storage blades using the procedures to shut down the management group in the CMC OnlineHelp or HP P4000 SAN Solution User Guide. IMPORTANT: Replace the SAS switches one at a time. When you remove a switch, I/O continues on the remaining switch. Before resetting a switch, verify that all storage is accessible by the remaining data path. Replacing both SAS switches at one time disconnects the storage and could compromise data integrity. If a SAS switch fails, storage access continues through the remaining SAS switch. This causes storage access to set a preference to all LUNs in the remaining data path. This preference remains in place until the controllers in the blade enclosure are power cycled, or the remaining path becomes unavailable. CAUTION: Power down the disk enclosure before disconnecting a SAS cable. Failing to do so may damage the I/O module. To replace the SAS switch: 1. Remove the power cable. 2. Disconnect the SAS cables, noting which cable goes to which port. 3. Remove the switch. 4. Install the replacement switch. 5. Attach the power cable. 6. Update the switch firmware. a. Open the HP Virtual SAS Manager. b. Select Force VSM Active. This selection copies the zone and firmware information from the active switch to the passive, replacement switch. The replacement switch then becomes the active switch. 7. Reconnect the SAS cables to their original locations, see "HP P4800 G2 solution cabling" (page 32). NOTE: Do not attach the SAS cables to the replacement switch until the firmware update is complete. Wait at least 60 seconds before removing another SAS switch. The SAS switch should now provide a redundant access path to storage. Storage controllers will distribute I/O evenly over the switches upon restart. Replacing a SAS cable CAUTION: Failing to follow these steps in this order may damage the I/O module. 1. Before disconnecting a SAS cable, power down the HP P4460sb G2 storage blades using the procedures to shut down the management group in the CMC OnlineHelp or HP P4000 SAN Solution User Guide. 2. Manually power off the disk enclosure. 3. Replace the SAS cable. 26 Removing and replacing the HP P4800 G2 solution components
-
 1
1 -
2
-
3
-
4
-
5
-
6
-
7
-
8
-
9
-
10
-
11
-
12
-
13
-
14
-
15
-
16
-
17
-
18
-
19
-
20
-
 21
21 -
 22
22 -
 23
23 -
 24
24 -
 25
25 -
 26
26 -
 27
27 -
 28
28 -
 29
29 -
 30
30 -
 31
31 -
32
-
33
-
34
-
35
-
36
-
37
-
38
-
39
-
40
-
41
-
42
-
43
-
44
-
45
-
46
-
47
-
48
-
49
-
50
-
51
-
52
-
53
 |
 |