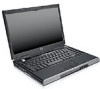
HP Pavilion dv1400 Hardware and Software Guide - Page 141
Removing or Inserting a Memory Module, Replacing a Battery Pack, Power.
 |
View all HP Pavilion dv1400 manuals
Add to My Manuals
Save this manual to your list of manuals |
Page 141 highlights
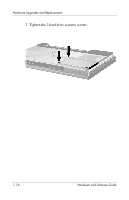
Hardware Upgrades and Replacements Removing or Inserting a Memory Module Å WARNING: To prevent exposure to electrical shock, access only the memory compartment during this procedure. The memory compartment and the battery and hard drive bays are the only user-accessible internal compartments on the notebook. All other areas that require a tool to access should be opened only by a service partner. Å WARNING: To prevent exposure to electrical shock and damage to the notebook, shut down the notebook, unplug the power cord, and remove the battery pack before installing a memory module. Ä CAUTION: To prevent electrostatic discharge from damaging electronic components: before beginning this procedure, discharge yourself of static electricity by touching a grounded metal object. For more information about preventing electrostatic damage, refer to the "Electrostatic Discharge" chapter in Regulatory and Safety Notices guide. 1. Save your work and close all open applications. 2. Shut down the notebook. If you are unsure whether the notebook is off or in hibernation, turn the notebook on in Windows and then shut it down through the Windows operating system. 3. Disconnect all external devices connected to the notebook. 4. Disconnect the notebook from external power. 5. Remove the battery pack. For instructions, refer to the "Replacing a Battery Pack" section in Chapter 3, "Power." 7-18 Hardware and Software Guide
-
 1
1 -
2
-
3
-
4
-
5
-
6
-
7
-
8
-
9
-
10
-
11
-
12
-
13
-
14
-
15
-
16
-
17
-
18
-
19
-
20
-
21
-
22
-
23
-
24
-
25
-
26
-
27
-
28
-
29
-
30
-
31
-
32
-
33
-
34
-
35
-
36
-
37
-
38
-
39
-
40
-
41
-
42
-
43
-
44
-
45
-
46
-
47
-
48
-
49
-
50
-
51
-
52
-
53
-
54
-
55
-
56
-
57
-
58
-
59
-
60
-
61
-
62
-
63
-
64
-
65
-
66
-
67
-
68
-
69
-
70
-
71
-
72
-
73
-
74
-
75
-
76
-
77
-
78
-
79
-
80
-
81
-
82
-
83
-
84
-
85
-
86
-
87
-
88
-
89
-
90
-
91
-
92
-
93
-
94
-
95
-
96
-
97
-
98
-
99
-
100
-
101
-
102
-
103
-
104
-
105
-
106
-
107
-
108
-
109
-
110
-
111
-
112
-
113
-
114
-
115
-
116
-
117
-
118
-
119
-
120
-
121
-
122
-
123
-
124
-
125
-
126
-
127
-
128
-
129
-
130
-
131
-
132
-
133
-
134
-
135
-
 136
136 -
 137
137 -
 138
138 -
 139
139 -
 140
140 -
 141
141 -
 142
142 -
 143
143 -
 144
144 -
 145
145 -
 146
146 -
147
-
148
-
149
-
150
-
151
-
152
-
153
-
154
-
155
-
156
-
157
-
158
-
159
-
160
-
161
-
162
-
163
-
164
-
165
-
166
-
167
-
168
-
169
-
170
-
171
-
172
-
173
 |
 |
