HP Photosmart 1200 HP Photo Scanner 1200 - (English) User Manual - Page 14
connect the scanner to the computer, turn on scanner power, scan a photo, to disconnect the scanner - manual
 |
View all HP Photosmart 1200 manuals
Add to My Manuals
Save this manual to your list of manuals |
Page 14 highlights
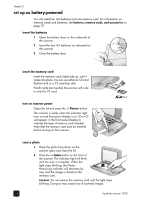
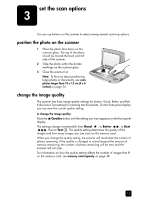
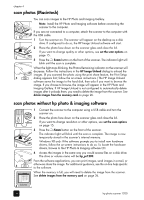
turn on scanner power 1 Open the lid and press the Power button on the scanner. When the indicator light comes on and the front panel display is on the scanner is ready. PC will appear in the front panel display to indicate that the scanner is computer-powered. Macintosh: The HP Image Unload dialog will automatically appear on the computer (by default). set up the scanner scan a photo 1 Place the photo face down on the scanner glass and close the lid. 2 Press the Scan button on the front of the scanner. The indicator light will blink until the scan is complete. Windows scan: On the computer, you will see a progress dialog as the photo is scanned. Then the HP Photo & Imaging Gallery will start and the image will appear. Macintosh scan: When the light stops blinking, the Photos Remaining indicator on the scanner will decrease. Follow the instructions in the HP Image Unload dialog to unload the images. The HP Image Unload software saves the image to the hard disk, then asks if you want to browse the image. If you choose to browse, the image will appear in the HP Photo and Imaging Gallery. to disconnect the scanner Disconnecting the scanner is optional. You can keep the other end of the cable plugged into the computer. Windows® 98 or Windows XP: 1 Unplug the USB cable from the scanner. Windows® 2000 or Millennium Edition 1 Click the Unplug or Eject Hardware icon located on the taskbar in the lower-right corner of the screen, and follow the on-screen instructions. 2 Unplug the USB cable from the scanner. Note: If you disconnect the USB cable before clicking the Unplug or Eject Hardware icon on the taskbar, you will receive a message regarding unsafe removal. You can disregard this message and click OK to continue. Macintosh 1 Unmount/eject the scanner by dragging the USB volume icon from the desktop to the trash. 2 Unplug the USB cable from the scanner. user's manual 13
-
 1
1 -
2
-
3
-
4
-
5
-
6
-
7
-
8
-
 9
9 -
 10
10 -
 11
11 -
 12
12 -
 13
13 -
 14
14 -
 15
15 -
 16
16 -
 17
17 -
 18
18 -
 19
19 -
20
-
21
-
22
-
23
-
24
-
25
-
26
-
27
-
28
-
29
-
30
-
31
-
32
-
33
-
34
-
35
-
36
-
37
-
38
-
39
-
40
-
41
-
42
-
43
-
44
-
45
-
46
-
47
-
48
 |
 |
