HP Photosmart 1200 HP Photo Scanner 1200 - (English) User Manual - Page 23
share images (print, e-mail, web), use hp photo & imaging gallery, print an image, Print Share - photo scanner support
 |
View all HP Photosmart 1200 manuals
Add to My Manuals
Save this manual to your list of manuals |
Page 23 highlights
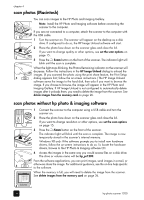
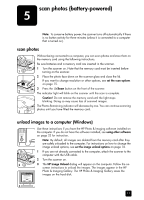
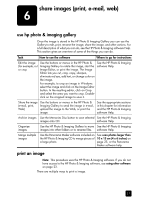
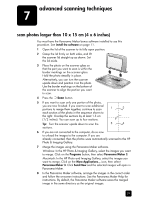
chapter 6 print with print share Note: Printing the print share images using a computer works only if you have installed the HP Photo & Imaging software. The image is created along with a DPOF file (Digital Print Order Format), which identifies images scanned with the print share feature. The HP Photo & Imaging software uses the DPOF to identify images you want to print. If you want to scan a photo specifically to make another print of it: 1 Place the photo on the scanner glass and close the lid. 2 Press the Print Share button on the scanner. You will see a printer icon in the front panel display. 3 Press the Scan button. If you were connected to a computer, you will see the HP Printer Service dialog (Windows) or HP Print Setup dialog (Macintosh) after the scan is complete. Follow the on-screen instructions to print the image. The image is also stored in the HP Photo & Imaging Gallery. If you scanned while battery-powered, the scanner created a DPOF file in addition to the scanned photo. You can now print the image in one of two ways: - Remove the memory card from the scanner and insert it into a compatible printer. The printer will use the DPOF to identify the images you want to print. - Unload the images to the computer. You will see the HP Printer Service dialog (Windows) or Print Setup dialog (Macintosh). Follow the onscreen instructions to print the image, and the computer will send the images to the printer. The image is also stored in the HP Photo & Imaging Gallery. print with hp photo & imaging gallery Once the image is stored on the hard disk, use one of the print buttons or menu choices in the HP Photo & Imaging Gallery to print the image. For more information, see the HP Photo & Imaging software Help. send an image in e-mail Note: This procedure uses the HP Photo & Imaging Gallery. If you do not have access to the HP Photo & Imaging Gallery, see using other software on page 23. You must have an Internet connection and a supported e-mail program. The following procedure describes how to use the Windows version of the software. The Macintosh version is slightly different, but has the same functionality. 1 Scan or unload the images into the HP Photo & Imaging Gallery. 2 From the HP Photo & Imaging Gallery, click the E-mail button. Alternatively, you can use the HP Instant Share button to access the e-mail function. 3 Follow the instructions on the computer screen. If the e-mail program is supported, a screen appears where you can address and compose a message. 22 hp photo scanner 1200
-
 1
1 -
2
-
3
-
4
-
5
-
6
-
7
-
8
-
9
-
10
-
11
-
12
-
13
-
14
-
15
-
16
-
17
-
 18
18 -
 19
19 -
 20
20 -
 21
21 -
 22
22 -
 23
23 -
 24
24 -
 25
25 -
 26
26 -
 27
27 -
 28
28 -
29
-
30
-
31
-
32
-
33
-
34
-
35
-
36
-
37
-
38
-
39
-
40
-
41
-
42
-
43
-
44
-
45
-
46
-
47
-
48
 |
 |
