HP Photosmart 1200 HP Photo Scanner 1200 - (English) User Manual - Page 19
scan photos (computer-powered), scan photos (Windows) - drivers
 |
View all HP Photosmart 1200 manuals
Add to My Manuals
Save this manual to your list of manuals |
Page 19 highlights
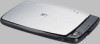
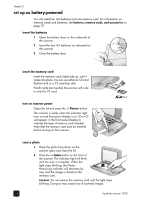
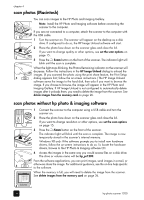
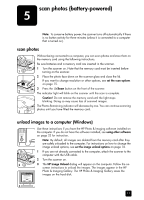
chapter 4 scan photos (Macintosh) You can scan images to the HP Photo and Imaging Gallery. Note: Install the HP Photo and Imaging software before connecting the scanner to the computer. If you are not connected to a computer, attach the scanner to the computer with the USB cable. 1 Turn the scanner on. The scanner will appear on the desktop as a disk drive. If configured to do so, the HP Image Unload software will start. 2 Place the photo face down on the scanner glass and close the lid. If you want to change quality or other options, see set the scan options on page 15. 3 Press the Scan button on the front of the scanner. The indicator light will blink until the scan is complete. When the light stops blinking, the Photos Remaining indicator on the scanner will decrease. Follow the instructions in the HP Image Unload dialog to unload the images. (If you scanned the photo using the print share feature, the Print Setup dialog appears first; follow the on-screen instructions.) The HP Image Unload software saves the image to the hard disk, then asks if you want to browse the image. If you choose to browse, the image will appear in the HP Photo and Imaging Gallery. If HP Image Unload is not configured to automatically delete images after it unloads them, you need to delete the image from the scanner. See delete images from the memory card on page 26. scan photos without hp photo & imaging software 1 Connect the scanner to the computer using a USB cable and turn the scanner on. 2 Place the photo face down on the scanner glass and close the lid. If you want to change resolution or other options, see set the scan options on page 15. 3 Press the Scan button on the front of the scanner. The indicator light will blink until the scan is complete. The image is now temporarily stored in the scanner's internal memory. Windows 98 only: If the software prompts you to install new hardware drivers, follow the on-screen instructions to do so. To locate the hardware drivers, browse to the HP Photo & Imaging software CD. 4 Access the images in the same way you would access files on a disk drive. The drive or volume name will be hp_ps1200. From the software applications, you can print images, send images in e-mail, or otherwise share the image. For additional guidance, see the on-line help specific to the software. When the memory is full, you will need to delete the image from the scanner. See delete images from the memory card on page 26. 18 hp photo scanner 1200
-
 1
1 -
2
-
3
-
4
-
5
-
6
-
7
-
8
-
9
-
10
-
11
-
12
-
13
-
 14
14 -
 15
15 -
 16
16 -
 17
17 -
 18
18 -
 19
19 -
 20
20 -
 21
21 -
 22
22 -
 23
23 -
 24
24 -
25
-
26
-
27
-
28
-
29
-
30
-
31
-
32
-
33
-
34
-
35
-
36
-
37
-
38
-
39
-
40
-
41
-
42
-
43
-
44
-
45
-
46
-
47
-
48
 |
 |
