HP Photosmart 1200 HP Photo Scanner 1200 - (English) User Manual - Page 26
advanced scanning techniques, scan photos larger than 10 x 15 cm 4 x 6 inches
 |
View all HP Photosmart 1200 manuals
Add to My Manuals
Save this manual to your list of manuals |
Page 26 highlights
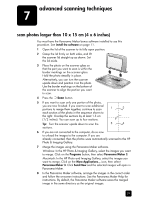
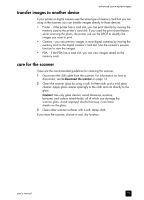
7 advanced scanning techniques scan photos larger than 10 x 15 cm (4 x 6 inches) You must have the Panorama Maker bonus software installed to use this procedure. See install the software on page 11. 1 Open the lid of the scanner to its fully open position. 2 Grasp the lid firmly on both sides, and lift the scanner lid straight up as shown. Set the lid aside. 3 Place the photo on the scanner glass so that the part you want to scan is within the border markings on the scanner glass. Hold the photo steadily in place. Alternatively, you can turn the scanner upside down and position it on the photo. Use the border markings on the bottom of the scanner to align the portion you want to scan. 4 Press the Scan button. 5 If you want to scan only one portion of the photo, you are now finished. If you want to scan additional portions to merge them together, continue to scan 1 2 each section of the photo in the sequence shown to the right. Overlap the sections by at least 1.3 cm (1/2 inches). You can scan up to four sections. Tip: Turn the scanner upside down to scan the 3 4 sections. 6 If you are not connected to the computer, do so now to unload the images to the computer. If you are already connected, then the photos were automatically scanned to the HP Photo & Imaging Gallery. 7 Merge the images using the Panorama Maker software. Windows: In the HP Photo & Imaging Gallery, select the images you want to merge. Click on the Programs button, then select Panorama Maker 3. Macintosh: In the HP Photo and Imaging Gallery, select the images you want to merge. Click on the More Applications... icon, then select Panorama Maker 3. Click Send Now and the selected images will open in Panorama Maker. 8 In the Panorama Maker software, arrange the images in the correct order and follow the on-screen instructions. See the Panorama Maker Help for instructions. By default, the Panorama Maker software saves the merged image in the same directory as the original images. 25
-
 1
1 -
2
-
3
-
4
-
5
-
6
-
7
-
8
-
9
-
10
-
11
-
12
-
13
-
14
-
15
-
16
-
17
-
18
-
19
-
20
-
 21
21 -
 22
22 -
 23
23 -
 24
24 -
 25
25 -
 26
26 -
 27
27 -
 28
28 -
 29
29 -
 30
30 -
 31
31 -
32
-
33
-
34
-
35
-
36
-
37
-
38
-
39
-
40
-
41
-
42
-
43
-
44
-
45
-
46
-
47
-
48
 |
 |
