HP Photosmart 380 User Guide - Page 35
Do this, Select Photos, Print, Add Frame, Black and White, Sepia, Antique, Add Color Effect
 |
View all HP Photosmart 380 manuals
Add to My Manuals
Save this manual to your list of manuals |
Page 35 highlights
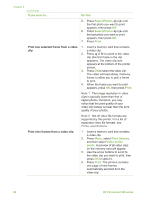
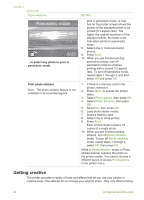
To try this... Do this Crop a photo Press Zoom or to increase or decrease the magnification by 0.25x. The maximum level is 5.0x. 1. Navigate to the photo you want to change, then press OK to select it. 2. Press Zoom to magnify the current photo. 3. Use the Select Photos arrows to move the crop box. 4. Press OK when the portion of the photo you want to print is in the crop box. 5. Press Print to begin printing. Cropping does not change your original photo. It only affects printing. Add a decorative frame Choose from a palette of various patterns and colors to make the frame stand out. 1. Navigate to the photo you want to change, then press OK to select it. 2. Press Menu. 3. Select Edit, then press OK. 4. Select Add Frame, then select OK. 5. Use the Select Photos arrows to highlight the frame pattern you want to use, then press OK. 6. Use the Select Photos arrows to highlight the frame color you want to use, then press OK. The photo appears on the printer screen with the frame. The effect does not change your original photo. It only affects printing. Add a color effect Set the printer to change the color effect of your prints to Black and White, Sepia, Antique, or None (default). 1. Navigate to the photo you want to change, then press OK to select it. 2. Press Menu. 3. Select Edit, then press OK. 4. Select Add Color Effect, then press OK. 5. Use the Select Photos arrows to highlight the color effect you want to use, then press OK. The photo appears on the printer screen with the selected color effect applied. The effect does not change your original photo. It only affects printing. Add the date and time to your prints You can print a stamp on the front of your photos that shows when the photo 1. Press Menu. 2. Select Preferences, then press OK. 3. Select Date/time, then press OK. HP Photosmart 380 series User's Guide 29
-
 1
1 -
2
-
3
-
4
-
5
-
6
-
7
-
8
-
9
-
10
-
11
-
12
-
13
-
14
-
15
-
16
-
17
-
18
-
19
-
20
-
21
-
22
-
23
-
24
-
25
-
26
-
27
-
28
-
29
-
 30
30 -
 31
31 -
 32
32 -
 33
33 -
 34
34 -
 35
35 -
 36
36 -
 37
37 -
 38
38 -
 39
39 -
 40
40 -
41
-
42
-
43
-
44
-
45
-
46
-
47
-
48
-
49
-
50
-
51
-
52
-
53
-
54
-
55
-
56
-
57
-
58
-
59
-
60
-
61
-
62
-
63
-
64
-
65
-
66
-
67
-
68
-
69
-
70
-
71
-
72
-
73
-
74
-
75
 |
 |