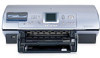
HP Photosmart 8400 HP Photosmart 8400 series Reference Guide - Page 25
Remove collections, Device name, Reset HP Instant Share, Send photos, Receive, Remove
 |
View all HP Photosmart 8400 manuals
Add to My Manuals
Save this manual to your list of manuals |
Page 25 highlights
This is on by default. If you do not want the printer to check for HP Instant Share collections automatically, select Off. • On makes the printer check for HP Instant Share collections at regular intervals. • Off keeps the printer from checking for collections. - Remove collections lets you select received collections you want removed. - Device name displays the network name of the printer. - Reset HP Instant Share resets all HP Instant Share options to the defaults. This means you have to go through HP Instant Share set up again to register the printer with the HP Instant Share service. To use HP Instant Share (USB) to send photos 1. Insert a memory card and select some photos. 2. Press HP Instant Share. 3. Follow the instructions on your computer to share the selected photos with others. See the onscreen Image Zone Help for information about using HP Instant Share. To use HP Instant Share (network) to send photos 1. Insert a memory card and select some photos. 2. Press HP Instant Share. 3. Select a destination, then press OK. 4. Select Send photos, then press OK. If the destination is an e-mail address, the printer sends an e-mail message with a link to the photo on the HP Instant Share website. If the destination is a compatible networked printer, an icon appears on the printer screen to notify the user that the photo is available. For more information, see the onscreen HP Image Zone Help. To use HP Instant Share (network) to receive photos 1. Press HP Instant Share. 2. Select Receive, then press OK. 3. Select a received HP Instant Share collection (message with photos), then press OK. The first photo included with that message appears on the printer screen. You can navigate, select, and print HP Instant Share photos in the same manner as you do with photos on a memory card or attached digital camera. If you insert a memory card or connect a digital camera while viewing HP Instant Share photos, the HP Instant Share session ends, and the normal viewing of photos from the card or camera begins. Your printer also checks at regular intervals to see if new photos have been received. An HP Instant Share received icon (an envelope) appears on the printer screen to notify you that HP Instant Share photo is available for viewing on the printer. 4. Choose one of the following, then press OK: - View to view the received photo on the printer screen. - Remove to delete the received photo. HP Photosmart 8400 series Reference Guide 23
-
 1
1 -
2
-
3
-
4
-
5
-
6
-
7
-
8
-
9
-
10
-
11
-
12
-
13
-
14
-
15
-
16
-
17
-
18
-
19
-
 20
20 -
 21
21 -
 22
22 -
 23
23 -
 24
24 -
 25
25 -
 26
26 -
 27
27 -
 28
28 -
 29
29 -
 30
30 -
31
-
32
-
33
-
34
-
35
-
36
-
37
-
38
-
39
-
40
-
41
-
42
-
43
-
44
-
45
-
46
-
47
-
48
-
49
 |
 |
