HP Photosmart A430 User Guide - A430 Series - Page 9
USB port, Video port, Power cord connection, Photo Fix, Print, way arrow button, Menu/OK, Cancel
 |
View all HP Photosmart A430 manuals
Add to My Manuals
Save this manual to your list of manuals |
Page 9 highlights
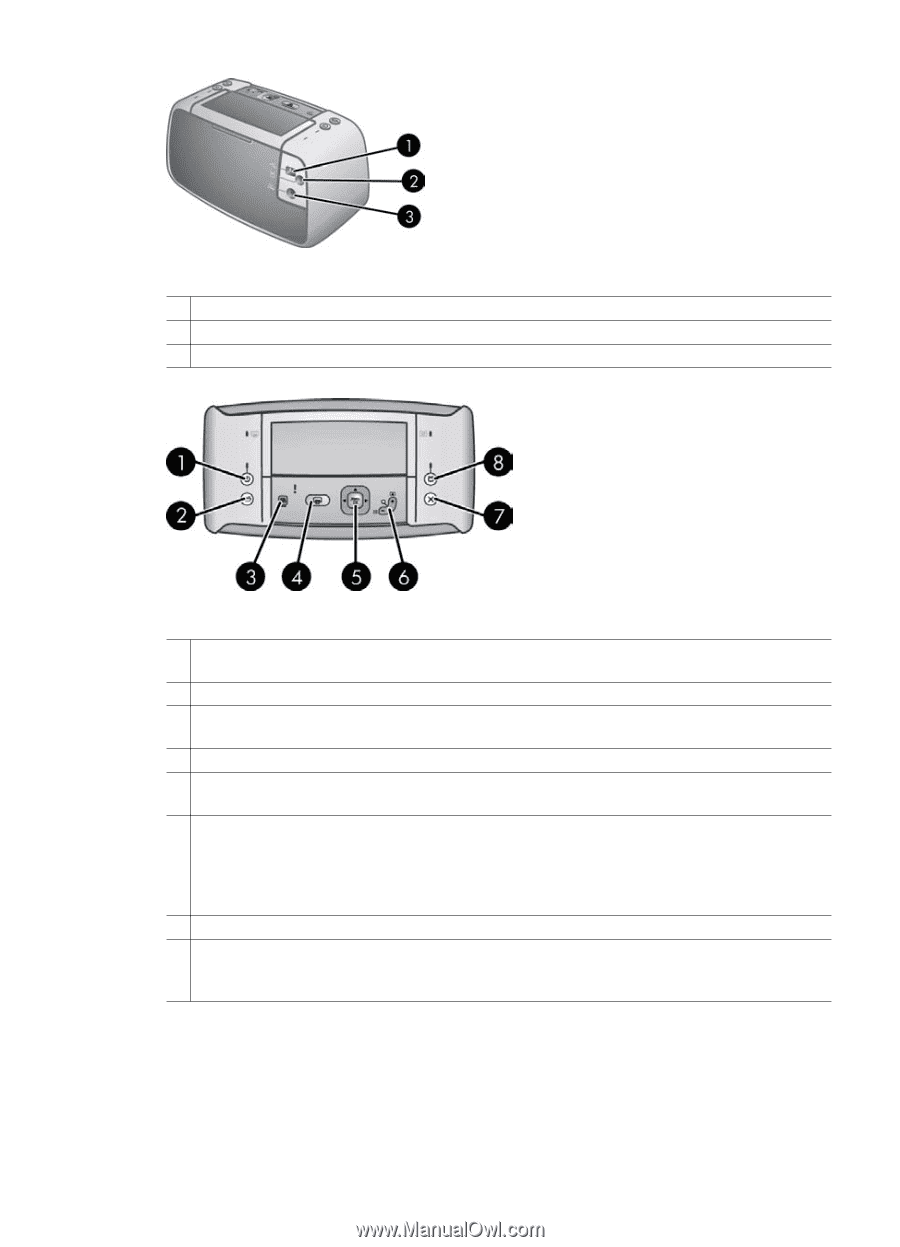
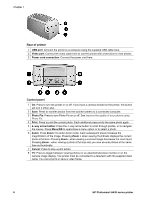
Chapter 1 Rear of printer 1 USB port: Connect the printer to a computer using the supplied USB cable here. 2 Video port: Connect the video cable here to use the printer with a television to view photos. 3 Power cord connection: Connect the power cord here. Control panel 1 On: Press to turn the printer on or off. If you have a camera docked on the printer, this button will turn it off/on also. 2 Save: Press to transfer photos from the docked camera to a connected computer. 3 Photo Fix: Press to turn Photo Fix on or off. See Improve the quality of your photos using Photo Fix. 4 Print: Press to print the current photo. Each additional press prints the same photo again. 5 4-way arrow button: Press the 4-way arrow button to scroll through photos, or to navigate the menus. Press Menu/OK to open/close a menu option or to select a photo. 6 Zoom: Press Zoom + to enter Zoom mode. Each subsequent press increases the magnification of the image. Pressing Zoom + when viewing thumbnails displays the current photo at full size. Pressing Zoom - when viewing a zoomed image decreases the zoom level. Pressing Zoom - when viewing a photo at full size lets you view several photos at the same time as thumbnails. 7 Cancel: Press to stop a print action. 8 TV: Press to toggle between viewing photos on an attached television monitor or on the camera image display. The printer must be connected to a television with the supplied video cable. You cannot print or save a video frame. 6 HP Photosmart A430 series printer
-
 1
1 -
2
-
3
-
 4
4 -
 5
5 -
 6
6 -
 7
7 -
 8
8 -
 9
9 -
 10
10 -
 11
11 -
 12
12 -
 13
13 -
 14
14 -
15
-
16
-
17
-
18
-
19
-
20
-
21
-
22
-
23
-
24
-
25
-
26
-
27
-
28
-
29
-
30
-
31
-
32
-
33
-
34
-
35
-
36
-
37
-
38
-
39
-
40
-
41
-
42
-
43
-
44
-
45
-
46
-
47
-
48
-
49
-
50
-
51
-
52
-
53
-
54
-
55
-
56
-
57
-
58
-
59
-
60
-
61
-
62
 |
 |