HP Photosmart Premium Printer - C309 User Guide - Page 68
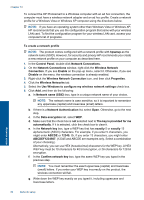
Enter a New Network Name SSID, Wireless Network Properties Connection
 |
View all HP Photosmart Premium Printer - C309 manuals
Add to My Manuals
Save this manual to your list of manuals |
Page 68 highlights
h. Select the check box for This is a computer-to-computer (ad hoc) network; wireless access points are not used. i. Click OK to close the Wireless network properties window, and then click OK again. j. Click OK again to close the Wireless Network Properties Connection window. To connect to a wireless ad hoc network 1. On Home screen, touch the right arrow to view more options. 2. Touch Setup. Network setup 3. Touch Network. NOTE: If the menu option you want is not visible on the screen, touch the up or down arrow to scroll through all the menu options. 4. Touch Wireless Setup Wizard. This runs the Wireless Setup Wizard. The setup wizard searches for available networks, and then displays a list of detected network names (SSIDs). The infrastructure networks appear first in the list, followed by available ad hoc networks. The networks with the strongest signal appear first, the weakest appear last. 5. On the display, look for the network name you created on your computer (for example, Mynetwork). 6. Touch the network name. If you found your network name and selected it, go on to step 7. If you do not see your network name in the list a. Touch Enter a New Network Name (SSID). The visual keyboard appears. b. Enter the SSID. Touch the appropriate letters or numbers on the visual keyboard. NOTE: You must enter the exact uppercase (capital) and lowercase (small) letters. Otherwise, the wireless connection will fail. c. When you have finished entering the new SSID, touch Done on the visual keyboard, and then touch OK. TIP: If the product is unable to discover the network based on the network name you entered, you will see the following prompts. You may want to move the product closer to the computer and try running the Wireless Setup Wizard again to automatically discover the network. Add the HP Photosmart to a network 65
-
 1
1 -
2
-
3
-
4
-
5
-
6
-
7
-
8
-
9
-
10
-
11
-
12
-
13
-
14
-
15
-
16
-
17
-
18
-
19
-
20
-
21
-
22
-
23
-
24
-
25
-
26
-
27
-
28
-
29
-
30
-
31
-
32
-
33
-
34
-
35
-
36
-
37
-
38
-
39
-
40
-
41
-
42
-
43
-
44
-
45
-
46
-
47
-
48
-
49
-
50
-
51
-
52
-
53
-
54
-
55
-
56
-
57
-
58
-
59
-
60
-
61
-
62
-
 63
63 -
 64
64 -
 65
65 -
 66
66 -
 67
67 -
 68
68 -
 69
69 -
 70
70 -
 71
71 -
 72
72 -
 73
73 -
74
-
75
-
76
-
77
-
78
-
79
-
80
-
81
-
82
-
83
-
84
-
85
-
86
-
87
-
88
-
89
-
90
-
91
-
92
-
93
-
94
-
95
-
96
-
97
-
98
-
99
-
100
-
101
-
102
-
103
-
104
-
105
-
106
-
107
-
108
-
109
-
110
-
111
-
112
-
113
-
114
-
115
-
116
-
117
-
118
-
119
-
120
-
121
-
122
-
123
-
124
-
125
-
126
-
127
-
128
-
129
-
130
-
131
-
132
-
133
-
134
-
135
-
136
-
137
-
138
-
139
-
140
-
141
-
142
-
143
-
144
-
145
-
146
-
147
-
148
-
149
-
150
-
151
-
152
-
153
-
154
-
155
-
156
-
157
-
158
-
159
-
160
-
161
-
162
-
163
 |
 |
