HP TC1100 HP Compaq tc1100 Tablet PC - Maintenance and Service Guide - Page 111
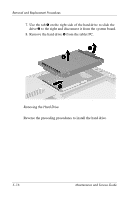
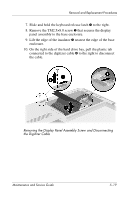
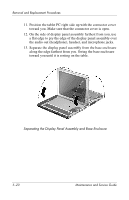
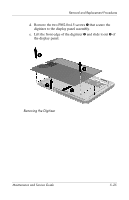
Separate the display panel assembly and the base enclosure.
 |
View all HP TC1100 manuals
Add to My Manuals
Save this manual to your list of manuals |
Page 111 highlights
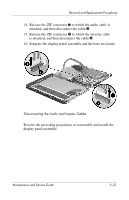
Removal and Replacement Procedures 14. Release the ZIF connector 1 to which the audio cable is attached, and then disconnect the cable 2. 15. Release the ZIF connector 3 to which the inverter cable is attached, and then disconnect the cable 4. 16. Separate the display panel assembly and the base enclosure. Disconnecting the Audio and Inverter Cables Reverse the preceding procedures to reassemble and install the display panel assembly. Maintenance and Service Guide 5-21
-
 1
1 -
2
-
3
-
4
-
5
-
6
-
7
-
8
-
9
-
10
-
11
-
12
-
13
-
14
-
15
-
16
-
17
-
18
-
19
-
20
-
21
-
22
-
23
-
24
-
25
-
26
-
27
-
28
-
29
-
30
-
31
-
32
-
33
-
34
-
35
-
36
-
37
-
38
-
39
-
40
-
41
-
42
-
43
-
44
-
45
-
46
-
47
-
48
-
49
-
50
-
51
-
52
-
53
-
54
-
55
-
56
-
57
-
58
-
59
-
60
-
61
-
62
-
63
-
64
-
65
-
66
-
67
-
68
-
69
-
70
-
71
-
72
-
73
-
74
-
75
-
76
-
77
-
78
-
79
-
80
-
81
-
82
-
83
-
84
-
85
-
86
-
87
-
88
-
89
-
90
-
91
-
92
-
93
-
94
-
95
-
96
-
97
-
98
-
99
-
100
-
101
-
102
-
103
-
104
-
105
-
 106
106 -
 107
107 -
 108
108 -
 109
109 -
 110
110 -
 111
111 -
 112
112 -
 113
113 -
 114
114 -
 115
115 -
 116
116 -
117
-
118
-
119
-
120
-
121
-
122
-
123
-
124
-
125
-
126
-
127
-
128
-
129
-
130
-
131
-
132
-
133
-
134
-
135
-
136
-
137
-
138
-
139
-
140
-
141
-
142
-
143
-
144
-
145
-
146
-
147
-
148
-
149
-
150
-
151
-
152
-
153
-
154
-
155
-
156
-
157
-
158
-
159
-
160
-
161
-
162
-
163
-
164
-
165
-
166
-
167
-
168
-
169
-
170
-
171
-
172
-
173
-
174
-
175
-
176
-
177
-
178
-
179
-
180
-
181
-
182
-
183
-
184
-
185
-
186
-
187
-
188
-
189
-
190
-
191
-
192
-
193
 |
 |
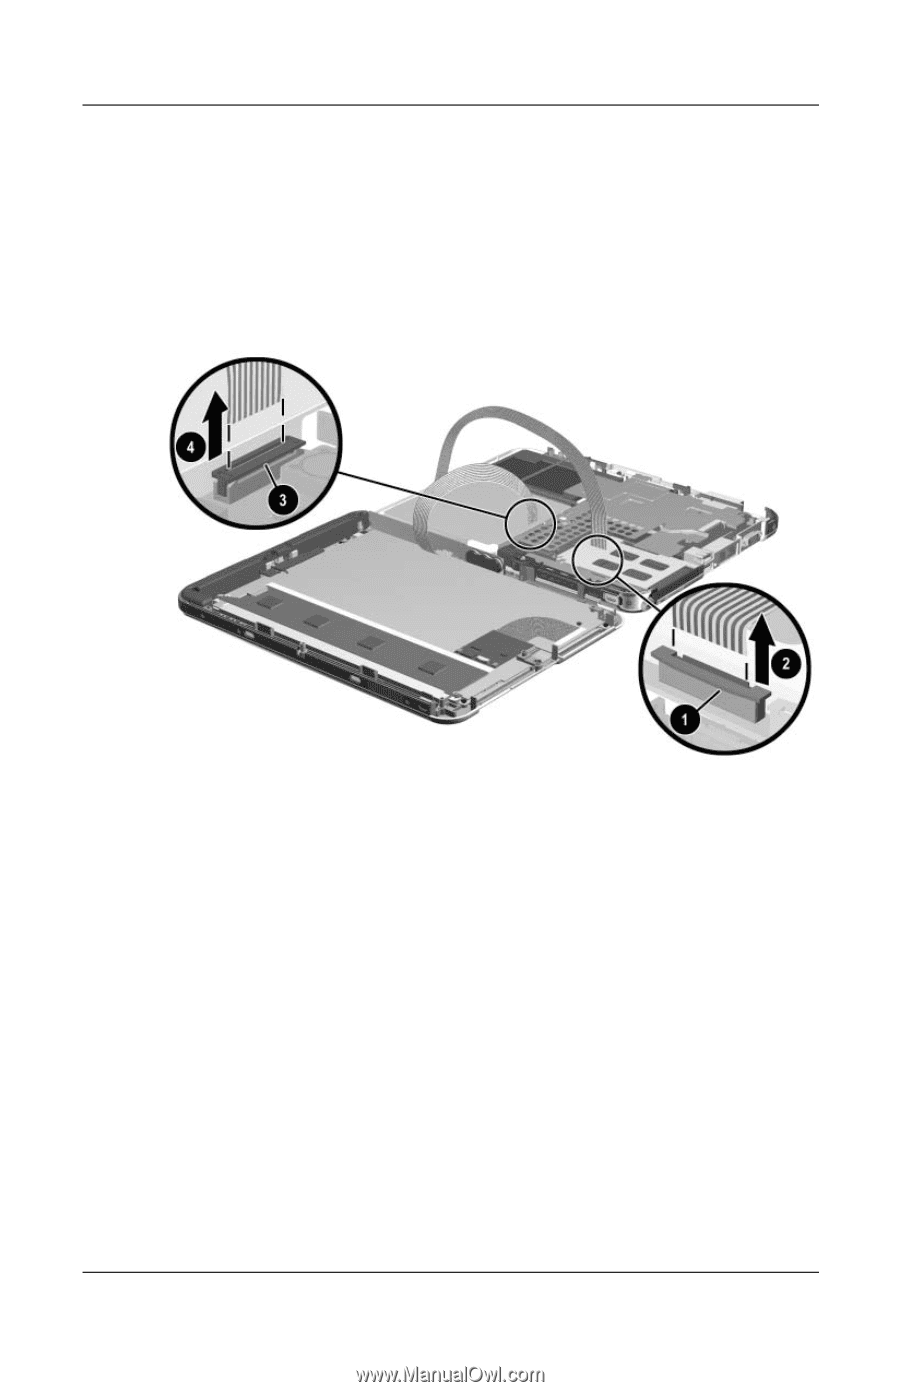
Removal and Replacement Procedures
Maintenance and Service Guide
5–21
14. Release the ZIF connector
1
to which the audio cable is
attached, and then disconnect the cable
2
.
15. Release the ZIF connector
3
to which the inverter cable
is attached, and then disconnect the cable
4
.
16. Separate the display panel assembly and the base enclosure.
Disconnecting the Audio and Inverter Cables
Reverse the preceding procedures to reassemble and install the
display panel assembly.