HP Tc2100 hp server tc2100 NOS installation guide (English) - Page 33
PHASE 2 – Install the HP Video Driver, Finish
 |
View all HP Tc2100 manuals
Add to My Manuals
Save this manual to your list of manuals |
Page 33 highlights
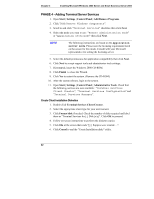
Chapter 3 Installing Microsoft Windows 2000 Server and Small Business Server 2000 PHASE 2 - Install the HP Video Driver The Microsoft Windows installation process has installed the standard VGA video driver. If you would like to make use of the high resolution video driver, follow these steps: 1. Ensure Microsoft Windows 2000 Service Pack (version #2 or above) is installed. This is a REQUIREMENT. 2. Logon as the "Administrator" on your HP Server tc2100 then insert HP Startup CD in the CD-ROM drive. The Startup CD will automatically start and a menu will display. NOTE Your HP server should auto-detect the presence of the Startup CD and start the Startup menu. If your HP server does not auto-start the Startup menu, start it by opening Startup.htm which can be found at the root level of the Startup CD. 3. Select "Automated installation of hp video driver for Microsoft Windows 2000 Server". 4. The HP video driver (ATI video) setup program will open. Click Next to start the installation then click Yes to accept the License Agreement. 5. Click Finish when prompted to restart your system at the end of the installation. (remember to remove all diskettes and CD-ROM from their respective drives). 6. After your logon, you will be notified that default display resolutions are being used. Click OK. You can now configure your settings and test them. PHASE 3 - Install the HP LAN driver Windows 2000 installation automatically detects the HP NIC and installs the driver bundled with the Windows 2000 CD-ROM. The following procedure will help you upgrade the driver using the HP Startup CD: 1. Insert the HP Startup CD in your new server. If CD-ROM auto-start is enabled, a menu will display. You may close this menu. 2. Open Start | Settings | Control Panel | System | Hardware | Device Manager. 3. Open the "Network Adapters" tree and double-click on the appropriate adapter to display its menu. 27
-
 1
1 -
2
-
3
-
4
-
5
-
6
-
7
-
8
-
9
-
10
-
11
-
12
-
13
-
14
-
15
-
16
-
17
-
18
-
19
-
20
-
21
-
22
-
23
-
24
-
25
-
26
-
27
-
 28
28 -
 29
29 -
 30
30 -
 31
31 -
 32
32 -
 33
33 -
 34
34 -
 35
35 -
 36
36 -
 37
37 -
 38
38 -
39
-
40
-
41
-
42
-
43
-
44
-
45
-
46
-
47
-
48
-
49
-
50
-
51
-
52
 |
 |