HP dx2200 HP Compaq dx2200 MT Business PC, 1st Edition - Page 115
Power LED flashes
 |
View all HP dx2200 manuals
Add to My Manuals
Save this manual to your list of manuals |
Page 115 highlights
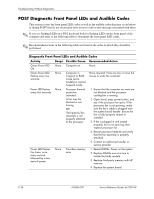
Troubleshooting Without Diagnostics Diagnostic Front Panel LEDs and Audible Codes (Continued) Activity Beeps Possible Cause Recommended Action Power LED flashes six times, once every second, followed by a two second pause. None Pre-video graphics error. For systems with a graphics card: 1. Reseat the graphics card. Power on the system. 2. Replace the graphics card. 3. Replace the system board. For systems with integrated graphics, replace the system board. Power LED flashes eight times, once every second, followed by a two second pause. None Invalid ROM based on bad checksum. 1. Reflash the ROM using a ROMPaq diskette. 2. Replace the system board. System does not power on and LEDs are not flashing. None System unable to power on. Press and hold the power button for less than 4 seconds. If the hard drive LED turns green, then: 1. Check that the voltage selector, located on the rear of the power supply, is set to the appropriate voltage. Proper voltage setting depends on your region. 2. Remove the expansion cards one at a time until the LED light on the system board turns on. 3. Replace the system board. OR Press and hold the power button for less than 4 seconds. If the hard drive LED does not turn on green then: 1. Check that the unit is plugged into a working AC outlet. 2. Open hood and check that the power button harness is properly connected to the system board. 3. Check that both power supply cables are properly connected to the system board. 4. Check to see if the LED light on the system board is turned on. If it is turned on, then replace the power button harness. 5. If the LED light on the system board is not turned on, then replace the power supply. 6. Replace the system board. Service Reference Guide, dx2200 MT 415606-001 E-27
-
 1
1 -
2
-
3
-
4
-
5
-
6
-
7
-
8
-
9
-
10
-
11
-
12
-
13
-
14
-
15
-
16
-
17
-
18
-
19
-
20
-
21
-
22
-
23
-
24
-
25
-
26
-
27
-
28
-
29
-
30
-
31
-
32
-
33
-
34
-
35
-
36
-
37
-
38
-
39
-
40
-
41
-
42
-
43
-
44
-
45
-
46
-
47
-
48
-
49
-
50
-
51
-
52
-
53
-
54
-
55
-
56
-
57
-
58
-
59
-
60
-
61
-
62
-
63
-
64
-
65
-
66
-
67
-
68
-
69
-
70
-
71
-
72
-
73
-
74
-
75
-
76
-
77
-
78
-
79
-
80
-
81
-
82
-
83
-
84
-
85
-
86
-
87
-
88
-
89
-
90
-
91
-
92
-
93
-
94
-
95
-
96
-
97
-
98
-
99
-
100
-
101
-
102
-
103
-
104
-
105
-
106
-
107
-
108
-
109
-
 110
110 -
 111
111 -
 112
112 -
 113
113 -
 114
114 -
 115
115 -
 116
116 -
 117
117 -
 118
118 -
 119
119 -
 120
120
 |
 |
