Hoover UH70102 Owners Manual - Page 10
Secondary, final, filters, Headlight, replacement
 |
View all Hoover UH70102 manuals
Add to My Manuals
Save this manual to your list of manuals |
Page 10 highlights
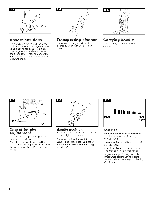
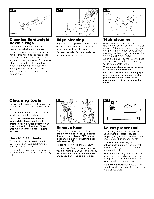
Secondary filters and final _H Cleaning secondary filter Disconnect outlet. cleaner from electrical The secondary filter (G), located underneath the retainer in the bottom of clean- er cavity, protects the motor from dirt particles. If filter becomes dirty, remove dirt cup (Fig. 3-2). Remove screw and pull retainer out. Lift out filter. Hand wash filter in cold water with mild detergent, then air dry. Reposition dry filter, retainer and screw. Replace dirt cup. Should you want to replace this filter, ask for HOOVER part No. 38765019. Cleaning final filter The final filter assists in returning clean air to the room. To remove this filter when it becomes dirty, remove dirt cup and pull down top of filter. Removing and replacing filter Lift out filter (H) and hand wash it in cold water with mild detergent. Let filter air dry and reposition it on the side of cleaner. Reposition dirt cup. Should you want to replace this filter, ask for HOOVER part No. 40110004. Do not operate cleaner without any of the filters in place. Check agitator shield Because your cleaner picks up so well, we strongly recommend you check for debris accumulation under the agitator shield each time you clean the filters. Removing debris under the shield will help maintain your cleaner's excellent pick up and suction. Remove debris as follows: 1. Disconnect cleaner from electrical outlet. 2. Check for dirt accumulation by removing bottom plate (Fig. 3-18), removing agitator (Fig. 3-19), and lifting agitator shield (Fig. 3-22). 3. Remove any debris and replace shield, agitator and bottom plate (Figs. 3-22 to 3-24). Headlight replacement What to buy This cleaner uses a 12 volt, wedge base type 912 bulb, HOOVER part No. 27313101. J ,\J'k \/ Remove lens - Disconnect cleaner from electrical outlet. Using a screwdriver, remove the two screws as shown and lift off lens. Install bulb - Pull old bulb straight out of socket. Push new bulb straight into socket until locked in place Excessive force is not required. 10
-
 1
1 -
2
-
3
-
4
-
 5
5 -
 6
6 -
 7
7 -
 8
8 -
 9
9 -
 10
10 -
 11
11 -
 12
12 -
 13
13 -
 14
14 -
 15
15 -
16
-
17
-
18
-
19
-
20
-
21
-
22
-
23
-
24
-
25
-
26
-
27
-
28
-
29
-
30
-
31
-
32
 |
 |
