Husqvarna TB 1000 Owners Manual - Page 3
Zusammenbau Der Maschine, Machine Assembly, Montaggio Della Macchina, Assembleren Van De Machine
 |
View all Husqvarna TB 1000 manuals
Add to My Manuals
Save this manual to your list of manuals |
Page 3 highlights
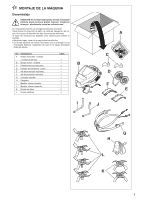
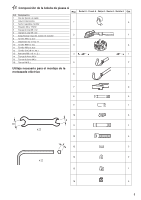
DE ZUSAMMENBAU DER MASCHINE Lieferumfang ACHTUNG: Ein falscher Zusammenbau der elektrischen Motorhacke kann zu schweren Verletzungen führen. Befolgen Sie unbedingt alle Anweisungen sorgfältig. Die elektrische Motorhacke wird teilweise vormontiert geliefert. Sie müssen Spornbefestigungen, Transportrad, Hackmesser, Lenker, Messerschutzbleche zusammenbauen. Wenn Sie die Anweisungen befolgen, sind hierfür nur wenige Minuten erforderlich. • Entnehmen Sie zunächst alle Teile aus dem Karton. • Die nachstehende Tabelle listet die mitgelieferten Teile auf. Prüfen Sie sie auf Vollständigkeit. Nr. Bezeichnung A Beutel - Inhalt: Anleitung + Teile + Säckchen mit Schrauben B Motorblock + Batterie C Spornbefestigungen D Transporträder + Sporn E Linkes Schutzblech F Rechtes Schutzblech G Lenkereinheit H Ladegerät i Rechter Lenkholm J Linker Lenkholm K Seitenmesser L Schneidwerkmesser EN MACHINE ASSEMBLY Unpacking WARNING: Assembling this machine wrongly can cause severe injury. Please carefully follow all the instructions. Your machine is delivered partially assembled. You must fit the stand supports, the transport wheel, the earth drills, the steering bars assembly and the earth drill protection wings. You will only need a few minutes to do this if you follow the instructions. • First remove all the items from the box. • The list below shows all the items supplied with your machine. Please ensure that you have everything. No. Designation A Instructions and parts pouch + bolts bag B Motor block and battery C Stand support plates D Transport wheels + stand E Left-hand protective wing F Right-hand protective wing G Steering bars assembly H Charger i Right-hand lower steering bar J Left-hand lower steering bar K Disc earth drills L Initial earth drills Stückzahl 1 1 2 1 1 1 1 1 1 1 2 4 Qty. 1 1 2 1 1 1 1 1 1 1 2 4 NL ASSEMBLEREN VAN DE MACHINE Nr. Omschrijving Hd. A Zakje met de handleiding + onderdelen + Uitpakken zakje met schroeven en bouten 1 B Motor blok + accu 1 ! LET OP: Als deze elektrische draaiende schoffelma- C Platte stukjes voor de stut steun 2 chine niet naar behoren gemonteerd wordt, kan dit ern- D Transportwielen + stut 1 stig letsel veroorzaken. Zorg ervoor dat u alle instructies zorgvuldig opvolgt. E Veiligheidsscherm links 1 F Veiligheidsscherm rechts 1 De elektrische schoffelmachine is bij de levering voor een deel gemonteerd. G Stuursysteem 1 U moet de stutsteun, het transportwiel, het stuursysteem en de veiligheidsschermen monteren. H Oplader 1 Dit is in enkele minuten gebeurd als u de instructies netjes opvolgt. i Onderstuur rechts 1 • Haal eerst alle onderdelen uit de doos. J Onderstuur links 1 • Op de hieronder staande lijst, zijn alle onderdelen die bij uw elek- K Schijfmessen 2 trische schoffelmachine geleverd worden, vermeld. Controleer of u ze allemaal hebt. L Startmessen 4 IT MONTAGGIO DELLA MACCHINA Rif. Denominazione Qtà A Busta istruzioni + pezzi Apertura dell'imballo + busta bulloneria 1 B Blocco motore + batteria 1 ATTENZIONE: Il montaggio errato della motozappa elettrica C Supporti sperone 2 costituisce pericolo per l'incolumità delle persone. D Ruotini di trasferimento + sperone 1 Controllare che le istruzioni siano accuratamente osservate. E Carter di protezione sinistro 1 Alla consegna, la motozappa elettrica è parzialmente assemblata. F Carter di protezione destro 1 Occorre montare i supporti dello sperone, il ruotino di trasferimento, le G Gruppo stegola 1 frese, il gruppo stegola, i carter di protezione delle frese. Pochi minuti bastano per eseguire le operazioni osservando le istruzio- H Caricabatteria 1 ni di montaggio. i Elemento inferiore stegola destro 1 • Rimuovere tutti gli elementi dallo scatolone. J Elemento inferiore stegola sinistro 1 • Nella lista riportata qui sotto sono elencati tutti i pezzi forniti con la K Frese disco 2 motozappa elettrica. Controllare che ci siano tutti. L Frese avvio 4 2
-
 1
1 -
 2
2 -
 3
3 -
 4
4 -
 5
5 -
 6
6 -
 7
7 -
 8
8 -
 9
9 -
10
-
11
-
12
-
13
-
14
-
15
-
16
-
17
-
18
-
19
-
20
-
21
-
22
-
23
-
24
-
25
-
26
-
27
-
28
-
29
-
30
-
31
-
32
-
33
-
34
-
35
-
36
-
37
-
38
-
39
-
40
-
41
-
42
-
43
-
44
 |
 |
