Husqvarna TB 1000 Owners Manual - Page 8
Montage der Hackmesser, Fitting the earth drills, Montaggio delle frese, Monteren van de messen,
 |
View all Husqvarna TB 1000 manuals
Add to My Manuals
Save this manual to your list of manuals |
Page 8 highlights
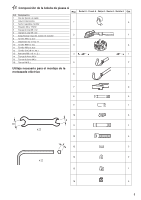
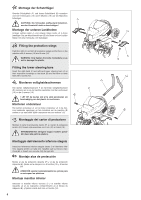
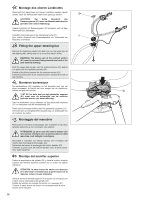
DE Montage der Hackmesser Die 4 Schneidwerkmesser (L) auf den Antriebswellen einsetzen K und mit 4 Splinten (5) befestigen. Die 2 Seitenmesser (K) jeweils am Ende einsetzen und mit 2 Splinten (5) befestigen. HINWEIS: Die Maschine kann mit 4 Hackmessern in Gebrauch genommen werden: 2 Schneidwerkmesser (L) und 2 Seitenmesser (M). ACHTUNG: Auf den Einbausinn der Sicherungssplinte (5) achten! Splinte entsprechend Drehsinn der Hackmesser, mit dem Ring zur Maschinen- hinterseite gerichtet montieren (siehe Abbildung). EN Fitting the earth drills 5 Fit the 4 initial earth drills (L) onto the transmission shaft and fix them with 4 pins (5). Fit the 2 disc earth drills (K) on the ends and fix them with 2 pins (5). NB: The machine can be used with just 4 drills: 2 initial drills (L) and 2 disc drills (M). WARNING: pay attention to the orientation of the pins (5). Fit them in the direction in which the drills will rotate, with the ring facing towards the back of the machine (see sketch). NL Monteren van de messen De 4 startmessen (L) op de overbrengingsassen monteren en vastzetten met de 4 pennen (5). De 2 schijfmessen (K) op het uiteinde monteren en vastzetten met 2 pennen (5). OPMERKING: De machine kan ook met 4 messen gebruikt worden, 2 startmessen (L) en 2 schijfmessen (M). ! LET OP de richting van de pennen (5), ze monteren in overeenstemming met de draairichting van de messen, de ring naar de achterzijde van de machine (zie tekening). IT Montaggio delle frese Montare le 4 frese avvio (L) sugli alberi di trasmissione, fissarli con 4 spine (5). Montare le 2 frese disco (K) all'estremità e fissarle con 2 spine (5). NOTA: la macchina può essere utilizzata con 4 frese, 2 frese avvio (L) e 2 frese disco (M). ATTENZIONE all'orientamento delle spine (5); montarle secondo il senso di rotazione delle frese, con l'anello rivolto verso la parte posteriore della macchina (vedi figura). ES Montaje de las fresas Montar 4 fresas rotativas (L) en los árboles de la transmisión y fijarlas con 4 clavijas (5). Montar las 2 fresas de disco (K) en el extremo y fijarlas con 2 clavijas (5). NOTA: Se puede utilizar la máquina con 4 fresas, 2 fresas rotativas (L) y 2 fresas de discos (M). ATENCIÓN: prestar atención a la orientación de las clavijas (5), montarlas según el sentido de rotación de las fresas del anillo hacia la parte trasera de la máquina (véase croquis). L 5 L K 7
-
 1
1 -
2
-
 3
3 -
 4
4 -
 5
5 -
 6
6 -
 7
7 -
 8
8 -
 9
9 -
 10
10 -
 11
11 -
 12
12 -
 13
13 -
14
-
15
-
16
-
17
-
18
-
19
-
20
-
21
-
22
-
23
-
24
-
25
-
26
-
27
-
28
-
29
-
30
-
31
-
32
-
33
-
34
-
35
-
36
-
37
-
38
-
39
-
40
-
41
-
42
-
43
-
44
 |
 |
