IBM 86481BU Installation Guide - Page 54
Connecting, cables, Updating, server, configuration
 |
View all IBM 86481BU manuals
Add to My Manuals
Save this manual to your list of manuals |
Page 54 highlights
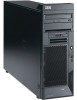
3. Make sure that each tab on the side cover is in its corresponding slot; then, close the cover-release latch. 4. Lock the side cover. Connecting the cables If the server cables and connector panel have color-coded connections, match the color of the cable end with the color of the connector. For example, match a blue cable end with a blue panel connector, a red cable end with a red connector, and so on. Attention: To prevent damage to equipment, connect the power cords last. The following illustration shows the input/output (I/O) connectors on the rear of the server. Note: The power supply might be different on some models. Power cords Mouse Keyboard Parallel Serial 1 Video USB 1 USB 2 Ethernet Serial 2 External SCSI knockout Updating the server configuration When you start the server for the first time after you add or remove an internal option or an external SCSI device, you might receive a message that the configuration has changed. The Configuration/Setup Utility program starts automatically so that you can save the new configuration settings. See Chapter 4, "Configuring the server," on page 49 for additional information. Some options have device drivers that you must install. See the documentation that comes with each option for information about installing device drivers. 40 xSeries 226 Type 8648: Installation Guide
-
 1
1 -
2
-
3
-
4
-
5
-
6
-
7
-
8
-
9
-
10
-
11
-
12
-
13
-
14
-
15
-
16
-
17
-
18
-
19
-
20
-
21
-
22
-
23
-
24
-
25
-
26
-
27
-
28
-
29
-
30
-
31
-
32
-
33
-
34
-
35
-
36
-
37
-
38
-
39
-
40
-
41
-
42
-
43
-
44
-
45
-
46
-
47
-
48
-
 49
49 -
 50
50 -
 51
51 -
 52
52 -
 53
53 -
 54
54 -
 55
55 -
 56
56 -
 57
57 -
 58
58 -
 59
59 -
60
-
61
-
62
-
63
-
64
-
65
-
66
-
67
-
68
-
69
-
70
-
71
-
72
-
73
-
74
-
75
-
76
-
77
-
78
-
79
-
80
-
81
-
82
-
83
-
84
-
85
-
86
-
87
-
88
-
89
-
90
-
91
-
92
-
93
-
94
-
95
-
96
-
97
-
98
-
99
-
100
-
101
-
102
-
103
-
104
-
105
-
106
-
107
-
108
-
109
-
110
-
111
-
112
-
113
-
114
-
115
-
116
-
117
-
118
 |
 |
