IBM 8852 User Guide - Page 31
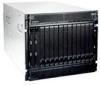
Rear view, Power connectors, I/O modules, Management modules, Blower modules, Serial connector
 |
UPC - 883436027069
View all IBM 8852 manuals
Add to My Manuals
Save this manual to your list of manuals |
Page 31 highlights
Rear view This section identifies the components, connectors, and LEDs on the rear of the BladeCenter unit. Power connector 2 I/O module bay 7 I/O module bay 8 Power connector 1 I/O module bay 1 I/O module bay 5 I/O module bay 2 I/O module bay 6 Blower module 2 error LED Rear system LED panel Management module 1 I/O module bay 3 Blower module 1 error LED Blower module 1 Management module bay 2 I/O module bay 4 Blower module 2 Serial connector I/O module bay 9 I/O module bay 10 Power connectors Connect a power cord from each power connector to a 220-volt power distribution unit or appropriate electrical outlet. See your specific power cable document for more information. I/O modules See the documentation that comes with each I/O module for a description of the LEDs and connectors on the I/O module. Management modules See the documentation that comes with each management module for a description of the LEDs and connectors on the module. Blower modules When the amber LED on a blower module is lit, an error has been detected in the blower or power to the blower is not present. The system-error LEDs on the BladeCenter system LED panels are also lit. Serial connector This connector provides direct access to the serial ports on each of the 14 blade server bays. Use this connector to attach the optional serial port breakout cable and connect up to 14 local consoles. See the documentation supplied with your blade server to see if it supports this cable. Rear system LED panel The LEDs on this panel provide status information. These LEDs duplicate the LEDs in the front system LED panel (see "Front system LED panel" on page 13 for more information). Chapter 2. BladeCenter unit power, controls, and indicators 15
-
 1
1 -
2
-
3
-
4
-
5
-
6
-
7
-
8
-
9
-
10
-
11
-
12
-
13
-
14
-
15
-
16
-
17
-
18
-
19
-
20
-
21
-
22
-
23
-
24
-
25
-
 26
26 -
 27
27 -
 28
28 -
 29
29 -
 30
30 -
 31
31 -
 32
32 -
 33
33 -
 34
34 -
 35
35 -
 36
36 -
37
-
38
-
39
-
40
-
41
-
42
-
43
-
44
-
45
-
46
-
47
-
48
-
49
-
50
-
51
-
52
-
53
-
54
-
55
-
56
-
57
-
58
-
59
-
60
-
61
-
62
-
63
-
64
-
65
-
66
-
67
-
68
-
69
-
70
-
71
-
72
-
73
-
74
-
75
-
76
-
77
-
78
-
79
-
80
-
81
-
82
 |
 |
