IBM 88743RU User Guide - Page 56
Installing, microprocessor
 |
UPC - 000435945938
View all IBM 88743RU manuals
Add to My Manuals
Save this manual to your list of manuals |
Page 56 highlights
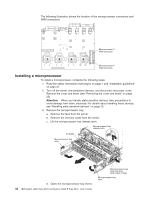
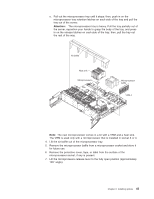
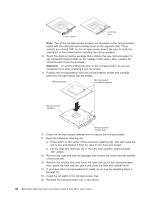
The following illustration shows the location of the microprocessor connectors and VRM connectors: Microprocessor 3 VRM connector 1 2 4 3 Microprocessor 4 VRM connector Installing a microprocessor To install a microprocessor, complete the following steps: 1. Read the safety information that begins on page v and "Installation guidelines" on page 21. 2. Turn off the server and peripheral devices, and disconnect the power cords. Remove the cover and bezel (see "Removing the cover and bezel" on page 23). Attention: When you handle static-sensitive devices, take precautions to avoid damage from static electricity. For details about handling these devices, see "Handling static-sensitive devices" on page 23. 3. Remove the microprocessor tray: a. Remove the fans from the server. b. Remove the memory cards from the server. c. Lift the microprocessor-tray release latch. Microprocessor-tray release latch Air baffle Microprocessor-tray lever d. Open the microprocessor-tray levers. 44 IBM System x3950 Type 8878 and System x3950 E Type 8879: User's Guide Microprocessor-tray retention latch (both sides of tray) Microprocessor-tray lever
-
 1
1 -
2
-
3
-
4
-
5
-
6
-
7
-
8
-
9
-
10
-
11
-
12
-
13
-
14
-
15
-
16
-
17
-
18
-
19
-
20
-
21
-
22
-
23
-
24
-
25
-
26
-
27
-
28
-
29
-
30
-
31
-
32
-
33
-
34
-
35
-
36
-
37
-
38
-
39
-
40
-
41
-
42
-
43
-
44
-
45
-
46
-
47
-
48
-
49
-
50
-
 51
51 -
 52
52 -
 53
53 -
 54
54 -
 55
55 -
 56
56 -
 57
57 -
 58
58 -
 59
59 -
 60
60 -
 61
61 -
62
-
63
-
64
-
65
-
66
-
67
-
68
-
69
-
70
-
71
-
72
-
73
-
74
-
75
-
76
-
77
-
78
-
79
-
80
-
81
-
82
-
83
-
84
-
85
-
86
-
87
-
88
-
89
-
90
-
91
-
92
-
93
-
94
-
95
-
96
-
97
-
98
-
99
-
100
-
101
-
102
-
103
-
104
-
105
-
106
-
107
-
108
-
109
-
110
 |
 |
