Intel TIGI2U User Guide - Page 47
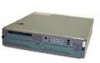
Attaching a Hard Disk Drive to a Carrier
 |
UPC - 735858176958
View all Intel TIGI2U manuals
Add to My Manuals
Save this manual to your list of manuals |
Page 47 highlights
Platform Installations and Upgrades 7. Align the holes in the drive to the holes in the drive carrier and attach it to the carrier using four screws that meet the drive vendor's recommendation (see letter "B"). Figure 23. Attaching a Hard Disk Drive to a Carrier 8. With the black lever in the fully open position, slide the drive assembly into the chassis. Insert the primary drive in the right bay (see letter "A"). The green latch at the front of the drive carrier must be to the right. Do not push on the black drive carrier lever until the lever begins to close by itself. 9. When the black drive carrier lever begins to close by itself, push on it to lock the drive assembly into place (see letter "B"). Intel® Carrier Grade Server TIGI2U User Guide 47
-
 1
1 -
2
-
3
-
4
-
5
-
6
-
7
-
8
-
9
-
10
-
11
-
12
-
13
-
14
-
15
-
16
-
17
-
18
-
19
-
20
-
21
-
22
-
23
-
24
-
25
-
26
-
27
-
28
-
29
-
30
-
31
-
32
-
33
-
34
-
35
-
36
-
37
-
38
-
39
-
40
-
41
-
 42
42 -
 43
43 -
 44
44 -
 45
45 -
 46
46 -
 47
47 -
 48
48 -
 49
49 -
 50
50 -
 51
51 -
 52
52 -
53
-
54
-
55
-
56
-
57
-
58
-
59
-
60
-
61
-
62
-
63
-
64
-
65
-
66
-
67
-
68
-
69
-
70
-
71
-
72
-
73
-
74
-
75
-
76
-
77
-
78
-
79
-
80
-
81
-
82
-
83
-
84
-
85
-
86
-
87
-
88
-
89
-
90
-
91
-
92
-
93
-
94
-
95
-
96
-
97
-
98
-
99
-
100
-
101
-
102
-
103
-
104
-
105
-
106
-
107
-
108
-
109
-
110
-
111
-
112
-
113
-
114
 |
 |
