Invacare 9XT Owners Manual - Page 63
Anti-tippers/wheel Locks
 |
View all Invacare 9XT manuals
Add to My Manuals
Save this manual to your list of manuals |
Page 63 highlights
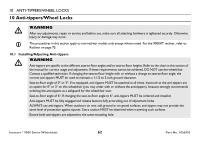
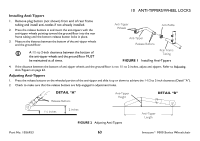
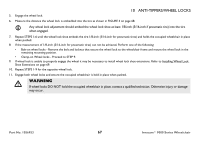
Installing Anti-Tippers 1. Remove plug button (not shown) from end of rear frame tubing and install anti-rattles if not already installed. 2. Press the release buttons in and insert the anti-tippers with the anti-tipper wheels pointing toward the ground/floor into the rear frame tubing until the bottom release button locks in place. 3. Measure the distance between the bottom of the anti-tipper wheels and the ground/floor. 10 ANTI-TIPPERS/WHEEL LOCKS Anti-Tipper Wheels Anti-Rattle Anti-Tipper Release Buttons A 1½ to 2-inch clearance between the bottom of the anti-tipper wheels and the ground/floor MUST be maintained at all times. Rear Frame Tubing FIGURE 1 Installing Anti-Tippers 4. If the distance between the bottom of anti-tipper wheels and the ground/floor is not 1½ to 2-inches, adjust anti-tippers. Refer to Adjusting Anti-Tippers on page 63. Adjusting Anti-Tippers 1. Press the release buttons on the wheeled portion of the anti-tipper and slide it up or down to achieve the 1-1/2 to 2-inch clearance (Detail "A"). 2. Check to make sure that the release buttons are fully engaged in adjustment holes. DETAIL "A" Release Buttons Anti-Tipper Height DETAIL "B" 1½ inches 2 inches FIGURE 2 Adjusting Anti-Tippers Anti-Tipper Length Part No. 1056953 63 Invacare® 9000 Series Wheelchair
-
 1
1 -
2
-
3
-
4
-
5
-
6
-
7
-
8
-
9
-
10
-
11
-
12
-
13
-
14
-
15
-
16
-
17
-
18
-
19
-
20
-
21
-
22
-
23
-
24
-
25
-
26
-
27
-
28
-
29
-
30
-
31
-
32
-
33
-
34
-
35
-
36
-
37
-
38
-
39
-
40
-
41
-
42
-
43
-
44
-
45
-
46
-
47
-
48
-
49
-
50
-
51
-
52
-
53
-
54
-
55
-
56
-
57
-
 58
58 -
 59
59 -
 60
60 -
 61
61 -
 62
62 -
 63
63 -
 64
64 -
 65
65 -
 66
66 -
 67
67 -
 68
68 -
69
-
70
-
71
-
72
-
73
-
74
-
75
-
76
-
77
-
78
-
79
-
80
-
81
-
82
-
83
-
84
-
85
-
86
-
87
-
88
-
89
-
90
-
91
-
92
 |
 |
