Invacare 9XT Owners Manual - Page 76
Installing Anti-Tippers, DETAIL A, DETAIL B
 |
View all Invacare 9XT manuals
Add to My Manuals
Save this manual to your list of manuals |
Page 76 highlights
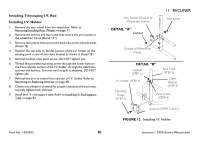
11 RECLINER Installing Anti-Tippers 1. Install the anti-rattles onto the rear frame tubes if not already in place (Detail "A"). 2. Position the anti-tippers with the anti-tipper wheels pointing toward the ground/floor 3. Press the release buttons. 4. Insert the anti-tippers into the rear frame tubing until the bottom release button locks in place. Refer to Detail "B" of FIGURE 7 and the following chart to ensure the correct anti-tipper is installed in the wheelchair. Seat-to-floor heights are approximate depending on front caster type. The anti-tipper height measurement MUST be taken with the anti-tipper on a flat surface. DETAIL "A" Release Buttons Rear Frame Tubing Anti-Tipper Wheels Anti-Tipper Anti-Rattle Anti-Tipper Height DETAIL "B" Anti-Tipper Length FIGURE 7 Installing Anti-Tippers Invacare® 9000 Series Wheelchair 76 Part No. 1056953
-
 1
1 -
2
-
3
-
4
-
5
-
6
-
7
-
8
-
9
-
10
-
11
-
12
-
13
-
14
-
15
-
16
-
17
-
18
-
19
-
20
-
21
-
22
-
23
-
24
-
25
-
26
-
27
-
28
-
29
-
30
-
31
-
32
-
33
-
34
-
35
-
36
-
37
-
38
-
39
-
40
-
41
-
42
-
43
-
44
-
45
-
46
-
47
-
48
-
49
-
50
-
51
-
52
-
53
-
54
-
55
-
56
-
57
-
58
-
59
-
60
-
61
-
62
-
63
-
64
-
65
-
66
-
67
-
68
-
69
-
70
-
 71
71 -
 72
72 -
 73
73 -
 74
74 -
 75
75 -
 76
76 -
 77
77 -
 78
78 -
 79
79 -
 80
80 -
 81
81 -
82
-
83
-
84
-
85
-
86
-
87
-
88
-
89
-
90
-
91
-
92
 |
 |
