Invacare IFX-20MP Owners Manual - Page 81
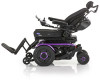
Fig. 10-6 Disconnect the Rear Battery, Removing/Installing the Front Shroud Assembly,
 |
View all Invacare IFX-20MP manuals
Add to My Manuals
Save this manual to your list of manuals |
Page 81 highlights
The power module P and GTRAC module W will remain attached to the battery door assembly during this procedure. 10 Service 7. Swing battery door assembly N with power module P and attached cables over the right rear swingarm and gently place on the ground. 6. Lift up and pull back to remove the battery door assembly from the battery box. Fig. 10-6 Disconnect the Rear Battery 8. Disconnect the rear battery harness (red handle) Q. 9. Slide the rear battery R out of the battery box. Ensure battery cable covers (not shown) do not snag on cables attached to the power module. 10. Remove the front shroud assembly. Refer to 10.4.2 Removing/Installing the Front Shroud Assembly, page 77. 11. Disconnect the front battery harness S (red handle). 12. Slide the front battery Z out of the rear of the battery box. 60101916-A 81
-
 1
1 -
2
-
3
-
4
-
5
-
6
-
7
-
8
-
9
-
10
-
11
-
12
-
13
-
14
-
15
-
16
-
17
-
18
-
19
-
20
-
21
-
22
-
23
-
24
-
25
-
26
-
27
-
28
-
29
-
30
-
31
-
32
-
33
-
34
-
35
-
36
-
37
-
38
-
39
-
40
-
41
-
42
-
43
-
44
-
45
-
46
-
47
-
48
-
49
-
50
-
51
-
52
-
53
-
54
-
55
-
56
-
57
-
58
-
59
-
60
-
61
-
62
-
63
-
64
-
65
-
66
-
67
-
68
-
69
-
70
-
71
-
72
-
73
-
74
-
75
-
 76
76 -
 77
77 -
 78
78 -
 79
79 -
 80
80 -
 81
81 -
 82
82 -
 83
83 -
 84
84 -
 85
85 -
 86
86 -
87
-
88
-
89
-
90
-
91
-
92
-
93
-
94
-
95
-
96
-
97
-
98
-
99
-
100
-
101
-
102
-
103
-
104
-
105
-
106
-
107
-
108
 |
 |
