Konica Minolta bizhub 36 bizhub 36/42 Administrator Operations User Guide - Page 55
Leading Edge Adjustment]
 |
View all Konica Minolta bizhub 36 manuals
Add to My Manuals
Save this manual to your list of manuals |
Page 55 highlights
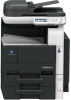
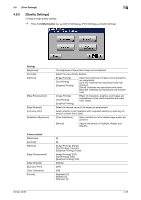
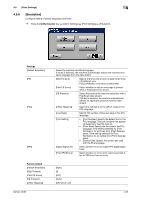
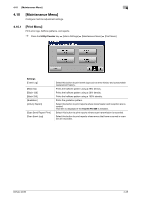
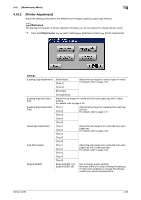
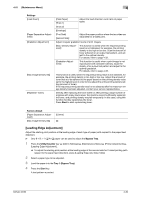
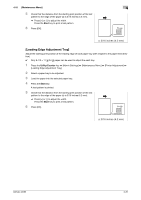
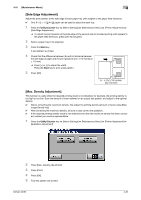
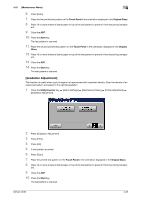
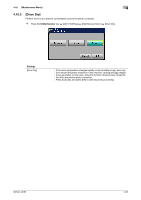
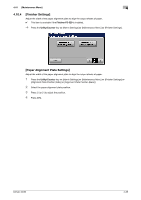
4.10 [Maintenance Menu] 4 Settings [Feed Zoom] [Paper Separation Adjustment] [Gradation Adjustment] [Max Image Density Adj] [Replenish Toner] [Plain Paper] [Thick 1] Adjust the feed direction zoom ratio of paper types. [Thick 2] [Envelope] [First Side] [Second Side] Adjust the paper position where the two sides are separated for 2-sided print. Adjust irregular gradation levels of print images. [Max. Density Adjustment] This function is useful when the required printing result is not obtained, for example, the printing density is too high or too low. Scan the amount of toner adhered on an output test pattern, and adjust to the optimal density. For details, refer to page 4-32. [Gradation Adjustment] This function is useful when a print image is not reproduced with consistent density. Scan the density of an output test pattern and adjust to the optimal gradation. For details, refer to page 4-33. This function is useful when the required printing result is not obtained, for example, the printing density is too high or too low. Adjust the amount of toner that is to be adhered to the paper based on the printing density value set to the highest level in order to fine-adjust the entire printing density setting (amount of toner). If the required printing density result is not obtained after the maximum image density has been adjusted, contact your service representative. Directly after replacing the toner bottle or after printing a large number of originals with many black areas, the machine cannot sufficiently replenish the toner, and printing density may fall temporarily. In this case, using this function forcibly replenishes the toner. Press Start to start replenishing toner. Factory default [Paper Separation Adjustment] [Max Image Density Adj] [0.0mm] [0] [Leading Edge Adjustment] Adjust the starting print position at the leading edge of each type of paper (with respect to the paper feed direction). 0 Only 8-1/2 e 11 v (A4 v) paper can be used to adjust the Bypass Tray. 1 Press the Utility/Counter key ö [Admin Settings] ö [Maintenance Menu] ö [Printer Adjustment] ö [Leading Edge Adjustment]. % To adjust the starting print position at the leading edge of the second side for 2-sided printing (with respect to the paper feed direction), press [Leading Edge Adj. Side 2 (Dx)]. 2 Select a paper type to be adjusted. 3 Load the paper into the Tray 1 (Bypass Tray). 4 Press the Start key. A test pattern is printed. bizhub 42/36 4-30
-
 1
1 -
2
-
3
-
4
-
5
-
6
-
7
-
8
-
9
-
10
-
11
-
12
-
13
-
14
-
15
-
16
-
17
-
18
-
19
-
20
-
21
-
22
-
23
-
24
-
25
-
26
-
27
-
28
-
29
-
30
-
31
-
32
-
33
-
34
-
35
-
36
-
37
-
38
-
39
-
40
-
41
-
42
-
43
-
44
-
45
-
46
-
47
-
48
-
49
-
 50
50 -
 51
51 -
 52
52 -
 53
53 -
 54
54 -
 55
55 -
 56
56 -
 57
57 -
 58
58 -
 59
59 -
 60
60 -
61
-
62
-
63
-
64
-
65
-
66
-
67
-
68
-
69
-
70
-
71
-
72
-
73
-
74
-
75
-
76
-
77
-
78
-
79
-
80
-
81
-
82
-
83
-
84
-
85
-
86
-
87
-
88
-
89
-
90
-
91
-
92
-
93
-
94
-
95
-
96
-
97
-
98
-
99
-
100
-
101
-
102
-
103
-
104
-
105
-
106
-
107
-
108
-
109
-
110
-
111
-
112
-
113
-
114
-
115
-
116
-
117
-
118
-
119
-
120
-
121
-
122
-
123
-
124
-
125
-
126
-
127
-
128
-
129
-
130
-
131
-
132
-
133
-
134
-
135
-
136
-
137
-
138
-
139
-
140
-
141
-
142
-
143
-
144
-
145
-
146
-
147
-
148
-
149
-
150
-
151
-
152
-
153
-
154
-
155
-
156
-
157
-
158
-
159
-
160
-
161
-
162
-
163
-
164
-
165
-
166
-
167
-
168
-
169
-
170
-
171
-
172
-
173
-
174
-
175
-
176
-
177
-
178
-
179
-
180
-
181
-
182
-
183
-
184
-
185
-
186
-
187
-
188
-
189
-
190
-
191
-
192
-
193
-
194
-
195
-
196
-
197
-
198
-
199
-
200
-
201
-
202
-
203
-
204
-
205
-
206
-
207
-
208
-
209
-
210
-
211
-
212
-
213
-
214
-
215
-
216
-
217
-
218
-
219
-
220
-
221
-
222
-
223
-
224
-
225
-
226
-
227
-
228
-
229
-
230
-
231
-
232
-
233
-
234
-
235
-
236
-
237
-
238
-
239
-
240
-
241
-
242
-
243
-
244
-
245
-
246
-
247
-
248
-
249
-
250
-
251
-
252
-
253
-
254
-
255
-
256
-
257
-
258
-
259
-
260
-
261
-
262
-
263
-
264
-
265
-
266
-
267
-
268
-
269
-
270
-
271
-
272
-
273
-
274
-
275
-
276
-
277
-
278
-
279
-
280
-
281
-
282
-
283
-
284
 |
 |
