Kyocera K127 User Guide - Page 31
Assigning a picture to a caller group
 |
View all Kyocera K127 manuals
Add to My Manuals
Save this manual to your list of manuals |
Page 31 highlights
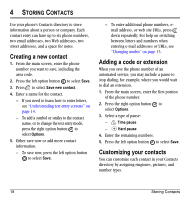
Assigning a picture to a caller group 1. Select Menu → Contacts → Groups. 2. Press down to scroll through the list of groups. When you come to the group you wish to assign a picture to, press . 3. Select Options → Picture → Assign picture. 4. Select Get more graphics, VirginXL graphics, Wallpapers, or Caller IDs. 5. Press up, down, left, and right to scroll through the list of available pictures. When you come to the desired picture, press the left option button to assign the picture to the group. User Guide for the MARBL Phone 23
-
 1
1 -
2
-
3
-
4
-
5
-
6
-
7
-
8
-
9
-
10
-
11
-
12
-
13
-
14
-
15
-
16
-
17
-
18
-
19
-
20
-
21
-
22
-
23
-
24
-
25
-
 26
26 -
 27
27 -
 28
28 -
 29
29 -
 30
30 -
 31
31 -
 32
32 -
 33
33 -
 34
34 -
 35
35 -
 36
36 -
37
-
38
-
39
-
40
-
41
-
42
-
43
-
44
-
45
-
46
-
47
-
48
-
49
-
50
-
51
-
52
-
53
-
54
-
55
-
56
-
57
-
58
-
59
-
60
-
61
-
62
-
63
-
64
 |
 |

User Guide for the MARBL Phone
23
Assigning a picture to a caller group
1.
Select
Menu
→
Contacts
→
Groups
.
2.
Press
down to scroll through the list of
groups. When you come to the group you wish
to assign a picture to, press
.
3.
Select
Options
→
Picture
→
Assign picture
.
4.
Select
Get more graphics
,
VirginXL graphics
,
Wallpapers
, or
Caller IDs
.
5.
Press
up, down, left, and right to scroll
through the list of available pictures. When
you come to the desired picture, press the left
option button
to assign the picture to
the group.