Kyocera TASKalfa 2550ci Fax System (W) Operation Guide - Page 120
Function, Description, FAX Operation Advanced, Operation Guide
 |
View all Kyocera TASKalfa 2550ci manuals
Add to My Manuals
Save this manual to your list of manuals |
Page 120 highlights
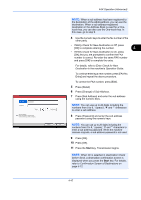
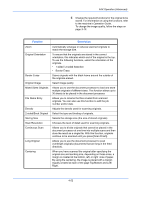
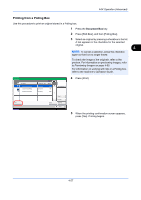
FAX Operation (Advanced) 4 Change the required functions for the original to be stored. For information on using the functions, refer to the machine's Operation Guide. To change the image quality, follow the steps on page 3-10. Function Zoom Original Orientation Border Erase Original Image Mixed Sized Originals File Name Entry Density 2-sided/Book Original Storing Size Scan Resolution Continuous Scan Long Original Centering Description Automatically enlarges or reduces scanned originals to match the storage size. To ensure that the originals are stored in the correct orientation, this indicates which end of the original is the top. To use the following functions, select the orientation of the originals. • 1-sided / 2-sided Selection • Border Erase Scans originals with the black frame around the outside of the originals erased. Select image quality. Allows you to use the document processor to load and store multiple originals of different sizes. This function allows up to 30 sheets to be placed in the document processor. Allows you to rename the files created from scanned originals. You can also use this function to add the job number and/or date. Adjusts the density used for scanning originals. Select the type and binding of originals. Selects the storage size (the size of stored originals). Chooses the level of detail used for scanning originals. Allows you to divide originals that cannot be placed in the document processor at one time into multiple scans and then store the result as a single file. With this function, originals continue to be scanned until you press [Scan Finish]. Allows you to use the document processor to scan overlength originals (documents that are long in the feed direction). When you have scanned the original after specifying the original size and sending size, depending on these sizes, a margin is created at the bottom, left, or right side of paper. By using the centering, the image is placed with a margin equally created at each of the page Top/Bottom and Left/ Right. 4-52
-
 1
1 -
2
-
3
-
4
-
5
-
6
-
7
-
8
-
9
-
10
-
11
-
12
-
13
-
14
-
15
-
16
-
17
-
18
-
19
-
20
-
21
-
22
-
23
-
24
-
25
-
26
-
27
-
28
-
29
-
30
-
31
-
32
-
33
-
34
-
35
-
36
-
37
-
38
-
39
-
40
-
41
-
42
-
43
-
44
-
45
-
46
-
47
-
48
-
49
-
50
-
51
-
52
-
53
-
54
-
55
-
56
-
57
-
58
-
59
-
60
-
61
-
62
-
63
-
64
-
65
-
66
-
67
-
68
-
69
-
70
-
71
-
72
-
73
-
74
-
75
-
76
-
77
-
78
-
79
-
80
-
81
-
82
-
83
-
84
-
85
-
86
-
87
-
88
-
89
-
90
-
91
-
92
-
93
-
94
-
95
-
96
-
97
-
98
-
99
-
100
-
101
-
102
-
103
-
104
-
105
-
106
-
107
-
108
-
109
-
110
-
111
-
112
-
113
-
114
-
 115
115 -
 116
116 -
 117
117 -
 118
118 -
 119
119 -
 120
120 -
 121
121 -
 122
122 -
 123
123 -
 124
124 -
 125
125 -
126
-
127
-
128
-
129
-
130
-
131
-
132
-
133
-
134
-
135
-
136
-
137
-
138
-
139
-
140
-
141
-
142
-
143
-
144
-
145
-
146
-
147
-
148
-
149
-
150
-
151
-
152
-
153
-
154
-
155
-
156
-
157
-
158
-
159
-
160
-
161
-
162
-
163
-
164
-
165
-
166
-
167
-
168
-
169
-
170
-
171
-
172
-
173
-
174
-
175
-
176
-
177
-
178
-
179
-
180
-
181
-
182
-
183
-
184
-
185
-
186
-
187
-
188
-
189
-
190
-
191
-
192
-
193
-
194
-
195
-
196
-
197
-
198
-
199
-
200
-
201
-
202
-
203
-
204
-
205
-
206
-
207
-
208
-
209
-
210
-
211
-
212
-
213
-
214
-
215
-
216
-
217
-
218
-
219
-
220
-
221
-
222
-
223
-
224
-
225
-
226
-
227
-
228
-
229
-
230
-
231
-
232
-
233
-
234
-
235
-
236
-
237
-
238
-
239
-
240
-
241
-
242
-
243
-
244
-
245
-
246
-
247
-
248
-
249
-
250
-
251
-
252
 |
 |
