Kyocera TASKalfa 2550ci Fax System (W) Operation Guide - Page 124
Using Polling Reception with Sub Addresses, IMPORTANT
 |
View all Kyocera TASKalfa 2550ci manuals
Add to My Manuals
Save this manual to your list of manuals |
Page 124 highlights
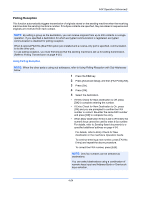
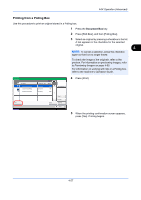
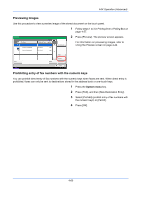
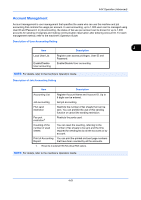
FAX Operation (Advanced) Using Polling Reception with Sub Addresses For polling reception, enter the sub address (on this machine, sub address and sub address password) set at the sending machine. This communication is still possible when the other party is using a third-party machine provided it is equipped with the same type of sub address communication function. IMPORTANT: Check the sub address set by the sender beforehand. 1 Press the FAX key. 2 Press [Advanced Setup], and then [FAX Polling RX]. 3 Press [On]. 4 Press [OK]. 5 Select the destination. Here, refer to Sub Address Transmission on page 4-46 when entering the sub address. • If Entry Check for New Destination is Off, press [OK] to complete entering the number. • If Entry Check for New Destination is On, press [OK] and you are prompted to confirm the FAX number is correct. Re-enter the same FAX number and press [OK] to complete the entry. • When [New Destination Entry] is set to [Prohibit], the numeric keys cannot be used to enter a fax number. For details, refer to Sending faxed documents to a specified additional address on page 4-64. For details, refer to Entry Check for New Destination in the machine's Operation Guide. To continue entering a new number, press [FAX No. Entry] and repeat the above procedure. To correct the FAX number, press [Edit]. NOTE: Only fax numbers can be selected as destinations. You can select destinations using a combination of numeric keys input, One-touch keys selection and selection from the Address Book containing registered sub addresses. 6 Press the Start key. The operations for reception begin. NOTE: When On is selected in Destination Check before Send, a destination confirmation screen is displayed when you press the Start key. For details, refer to Confirmation Screen of Destinations on page 5-12. 4-56
-
 1
1 -
2
-
3
-
4
-
5
-
6
-
7
-
8
-
9
-
10
-
11
-
12
-
13
-
14
-
15
-
16
-
17
-
18
-
19
-
20
-
21
-
22
-
23
-
24
-
25
-
26
-
27
-
28
-
29
-
30
-
31
-
32
-
33
-
34
-
35
-
36
-
37
-
38
-
39
-
40
-
41
-
42
-
43
-
44
-
45
-
46
-
47
-
48
-
49
-
50
-
51
-
52
-
53
-
54
-
55
-
56
-
57
-
58
-
59
-
60
-
61
-
62
-
63
-
64
-
65
-
66
-
67
-
68
-
69
-
70
-
71
-
72
-
73
-
74
-
75
-
76
-
77
-
78
-
79
-
80
-
81
-
82
-
83
-
84
-
85
-
86
-
87
-
88
-
89
-
90
-
91
-
92
-
93
-
94
-
95
-
96
-
97
-
98
-
99
-
100
-
101
-
102
-
103
-
104
-
105
-
106
-
107
-
108
-
109
-
110
-
111
-
112
-
113
-
114
-
115
-
116
-
117
-
118
-
 119
119 -
 120
120 -
 121
121 -
 122
122 -
 123
123 -
 124
124 -
 125
125 -
 126
126 -
 127
127 -
 128
128 -
 129
129 -
130
-
131
-
132
-
133
-
134
-
135
-
136
-
137
-
138
-
139
-
140
-
141
-
142
-
143
-
144
-
145
-
146
-
147
-
148
-
149
-
150
-
151
-
152
-
153
-
154
-
155
-
156
-
157
-
158
-
159
-
160
-
161
-
162
-
163
-
164
-
165
-
166
-
167
-
168
-
169
-
170
-
171
-
172
-
173
-
174
-
175
-
176
-
177
-
178
-
179
-
180
-
181
-
182
-
183
-
184
-
185
-
186
-
187
-
188
-
189
-
190
-
191
-
192
-
193
-
194
-
195
-
196
-
197
-
198
-
199
-
200
-
201
-
202
-
203
-
204
-
205
-
206
-
207
-
208
-
209
-
210
-
211
-
212
-
213
-
214
-
215
-
216
-
217
-
218
-
219
-
220
-
221
-
222
-
223
-
224
-
225
-
226
-
227
-
228
-
229
-
230
-
231
-
232
-
233
-
234
-
235
-
236
-
237
-
238
-
239
-
240
-
241
-
242
-
243
-
244
-
245
-
246
-
247
-
248
-
249
-
250
-
251
-
252
 |
 |