LG VS920 Owners Manual - English - Page 41
Customizing the Home Screen - reset
 |
View all LG VS920 manuals
Add to My Manuals
Save this manual to your list of manuals |
Page 41 highlights
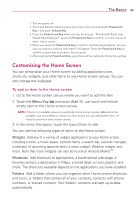
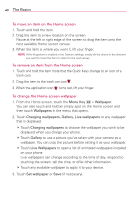
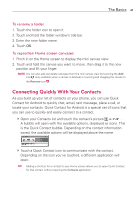
The Basics 39 1. Turn the power off. 2. Touch and hold the following keys at the same time for 8 seconds: Power/Lock Key + the down Volume Key. 3. Press the Power/Lock Key when you see the pop-up "Permanently Erase User Data & Reset Settings?", press the Power/Lock Key to confirm, or touch any up or down key to cancel. 4. When you press the Power/Lock Key to confirm, another pop-up stating "Are you sure you want to continue with erase?" will appear. Press the Power/Lock Key to confirm or touch any up or down key to cancel. 5. After pressing the Power/Lock Key, your phone will be restored to the factory settings. Customizing the Home Screen You can personalize your Home screen by adding application icons, shortcuts, widgets, and other items to any Home screen canvas. You can also change the wallpaper. To add an item to the Home screen 1. Go to the Home screen canvas where you want to add the item. 2. Touch the Menu Key and touch Add. Or, just touch and hold an empty spot on the Home screen canvas. NOTE If there is no available space on a particular Home screen canvas, Add will not be available; you must delete or remove an item before you can add another item. Or, switch to another Home screen canvas. 3. In the menu that opens, touch the type of item to add. You can add the following types of items to the Home screen: Widgets Add any of a variety of widget applications to your Home screen, including a clock, a music player, a photo frame, a search bar, a power manager, a calendar of upcoming appointments, a news widget, Weather widget, and more. Note that more widgets can also be found on Android MarketTM. Shortcuts Add shortcuts to applications, a bookmarked web page, a favorite contact, a destination in Maps, a Gmail label, a music playlist, and more. The shortcuts available depend on the applications you have installed. Folders Add a folder where you can organize other Home screen shortcuts and icons, or folders that contain all of your contacts, contacts with phone numbers, or starred contacts. Your folders' contents are kept up-to-date automatically.
-
 1
1 -
2
-
3
-
4
-
5
-
6
-
7
-
8
-
9
-
10
-
11
-
12
-
13
-
14
-
15
-
16
-
17
-
18
-
19
-
20
-
21
-
22
-
23
-
24
-
25
-
26
-
27
-
28
-
29
-
30
-
31
-
32
-
33
-
34
-
35
-
 36
36 -
 37
37 -
 38
38 -
 39
39 -
 40
40 -
 41
41 -
 42
42 -
 43
43 -
 44
44 -
 45
45 -
 46
46 -
47
-
48
-
49
-
50
-
51
-
52
-
53
-
54
-
55
-
56
-
57
-
58
-
59
-
60
-
61
-
62
-
63
-
64
-
65
-
66
-
67
-
68
-
69
-
70
-
71
-
72
-
73
-
74
-
75
-
76
-
77
-
78
-
79
-
80
-
81
-
82
-
83
-
84
-
85
-
86
-
87
-
88
-
89
-
90
-
91
-
92
-
93
-
94
-
95
-
96
-
97
-
98
-
99
-
100
-
101
-
102
-
103
-
104
-
105
-
106
-
107
-
108
-
109
-
110
-
111
-
112
-
113
-
114
-
115
-
116
-
117
-
118
-
119
-
120
-
121
-
122
-
123
-
124
-
125
-
126
-
127
-
128
-
129
-
130
-
131
-
132
-
133
-
134
-
135
-
136
-
137
-
138
-
139
-
140
-
141
-
142
-
143
-
144
-
145
-
146
-
147
-
148
-
149
-
150
-
151
-
152
-
153
-
154
-
155
-
156
-
157
-
158
-
159
-
160
-
161
-
162
-
163
-
164
-
165
-
166
-
167
-
168
-
169
-
170
-
171
-
172
-
173
-
174
-
175
-
176
-
177
-
178
-
179
-
180
-
181
-
182
-
183
-
184
-
185
-
186
-
187
-
188
-
189
-
190
-
191
-
192
-
193
-
194
-
195
-
196
-
197
-
198
-
199
-
200
-
201
-
202
-
203
-
204
-
205
-
206
-
207
-
208
-
209
-
210
-
211
-
212
-
213
-
214
-
215
-
216
-
217
-
218
-
219
-
220
-
221
-
222
-
223
-
224
-
225
-
226
-
227
-
228
-
229
-
230
-
231
-
232
-
233
-
234
-
235
-
236
-
237
-
238
-
239
-
240
-
241
-
242
-
243
-
244
-
245
-
246
-
247
-
248
-
249
-
250
-
251
-
252
-
253
-
254
-
255
-
256
-
257
-
258
-
259
-
260
-
261
-
262
-
263
-
264
-
265
-
266
-
267
-
268
-
269
-
270
-
271
-
272
-
273
-
274
-
275
-
276
-
277
-
278
-
279
-
280
-
281
-
282
-
283
-
284
-
285
-
286
-
287
-
288
-
289
-
290
-
291
-
292
-
293
-
294
-
295
-
296
-
297
-
298
-
299
-
300
-
301
-
302
-
303
-
304
-
305
-
306
-
307
-
308
-
309
-
310
-
311
-
312
-
313
-
314
-
315
-
316
-
317
-
318
-
319
-
320
-
321
-
322
-
323
-
324
-
325
-
326
-
327
-
328
-
329
-
330
-
331
-
332
-
333
-
334
-
335
-
336
-
337
-
338
-
339
-
340
-
341
-
342
-
343
-
344
-
345
-
346
-
347
-
348
-
349
-
350
-
351
-
352
-
353
-
354
-
355
-
356
-
357
-
358
-
359
-
360
-
361
-
362
-
363
-
364
-
365
-
366
-
367
-
368
-
369
-
370
-
371
-
372
-
373
-
374
-
375
-
376
-
377
-
378
-
379
-
380
-
381
-
382
-
383
-
384
-
385
-
386
-
387
-
388
-
389
-
390
-
391
-
392
-
393
-
394
-
395
-
396
-
397
-
398
-
399
-
400
-
401
-
402
-
403
-
404
-
405
-
406
-
407
-
408
-
409
-
410
-
411
-
412
-
413
-
414
-
415
-
416
-
417
-
418
-
419
-
420
-
421
-
422
-
423
-
424
-
425
-
426
-
427
-
428
-
429
-
430
-
431
-
432
-
433
-
434
-
435
-
436
-
437
-
438
-
439
-
440
-
441
-
442
-
443
-
444
-
445
-
446
-
447
-
448
-
449
-
450
-
451
 |
 |
