Lacie 300673 User Manual - Page 38
Backing Up LaCie Ethernet, Disk Using the Built-In Backup, Engine
 |
UPC - 093053306731
View all Lacie 300673 manuals
Add to My Manuals
Save this manual to your list of manuals |
Page 38 highlights
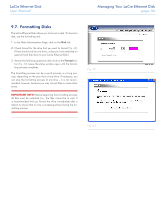
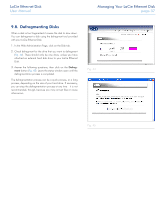
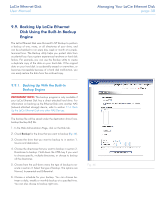
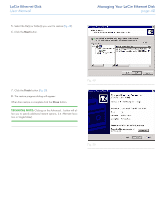
LaCie Ethernet Disk User Manual Managing Your LaCie Ethernet Disk page 38 9.9. Backing Up LaCie Ethernet Disk Using the Built-In Backup Engine The LaCie Ethernet Disk uses Microsoft's NT Backup to perform a backup of one, many, or all directories of your drive, and can be scheduled to run every day, week or month at a predetermined time. The Backup utility helps you protect data from accidental loss if your system experiences hardware or hard disk failure. For example, you can use the Backup utility to create a duplicate copy of the data on your hard disk. If the original data on your hard disk is accidentally erased or overwritten, or becomes inaccessible because of a hard disk malfunction, you can easily restore the data from the archived copy. 9.9.1. Backing Up With the Built-In Backup Engine IMPORTANT INFO: This backup program is only available if your LaCie Ethernet Disk has a direct attached hard drive. For information on backing up the Ethernet Disk onto another NAS (network-attached storage) device, refer to section 11.4. Back Up the LaCie Ethernet Disk onto other NAS Devices. The backup file will be saved under the destination drive (\nas. backup\backup.bkf) file. 1. In the Web Administration Page, click on the Disk tab. 2. Check Backup for the drive that you want to backup (Fig. 46). 3. Choose the drive that you want to backup to in section 1. Source and destination. 4. Choose the directories that you want to backup in section 2. Directories to backup. Hold down the CTRL key if you want to choose specific, multiple directories, or choose to backup all the directories. 5. Choose from the pull-down menu the type of backup to execute in section 3. Select the type of backup. The options are Normal, Incremental and Differential. 6. Choose a schedule for your backup. You can choose between a daily, weekly or monthly backup at a specified time. You can also choose to backup right now. Fig. 46
-
 1
1 -
2
-
3
-
4
-
5
-
6
-
7
-
8
-
9
-
10
-
11
-
12
-
13
-
14
-
15
-
16
-
17
-
18
-
19
-
20
-
21
-
22
-
23
-
24
-
25
-
26
-
27
-
28
-
29
-
30
-
31
-
32
-
 33
33 -
 34
34 -
 35
35 -
 36
36 -
 37
37 -
 38
38 -
 39
39 -
 40
40 -
 41
41 -
 42
42 -
 43
43 -
44
-
45
-
46
-
47
-
48
-
49
-
50
-
51
-
52
-
53
-
54
-
55
-
56
-
57
-
58
-
59
-
60
-
61
-
62
 |
 |
