Lantronix Spider Lantronix Spider / SpiderDuo - User Guide - Page 30
Target Computer Setup, Video Resolutions and Refresh Rates Configuration
 |
View all Lantronix Spider manuals
Add to My Manuals
Save this manual to your list of manuals |
Page 30 highlights
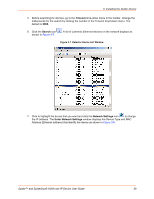
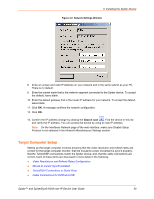
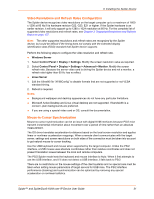
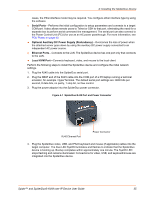
3: Installing the Spider Device Figure 3-8 Network Settings Window 8. Enter an unique and valid IP Address on your network and in the same subnet as your PC. There is no default. 9. Enter the subnet mask that is the network segment connected to the Spider device. To accept the default, leave blank. 10. Enter the default gateway that is the router IP address for your network. To accept the default, leave blank. 11. Click OK. A message confirms the network configuration. 12. Click OK. 13. Confirm the IP address change by clicking the Search icon . Find the device in this list and verify the IP address. You can access the device by using its new IP address. Note: On the Interfaces Network page of the web interface, make sure Disable Setup Protocol is not selected in the Network Miscellaneous Settings section. Target Computer Setup Setting up the target computer involves ensuring that the video resolution and refresh rates are correct for the target computer monitor; that the mouse-to-cursor movement is sync'd properly; that the Telnet/SSH connections match the Spider device; and, that the cable connections are correct. Each of these items are discussed in more detail in the following: Video Resolutions and Refresh Rates Configuration Mouse-to-Cursor Synchronization Telnet/SSH Connections to Serial Ports Cable Connections for KVM and USB Spider™ and SpiderDuo® KVM-over-IP Device User Guide 30
-
 1
1 -
2
-
3
-
4
-
5
-
6
-
7
-
8
-
9
-
10
-
11
-
12
-
13
-
14
-
15
-
16
-
17
-
18
-
19
-
20
-
21
-
22
-
23
-
24
-
 25
25 -
 26
26 -
 27
27 -
 28
28 -
 29
29 -
 30
30 -
 31
31 -
 32
32 -
 33
33 -
 34
34 -
 35
35 -
36
-
37
-
38
-
39
-
40
-
41
-
42
-
43
-
44
-
45
-
46
-
47
-
48
-
49
-
50
-
51
-
52
-
53
-
54
-
55
-
56
-
57
-
58
-
59
-
60
-
61
-
62
-
63
-
64
-
65
-
66
-
67
-
68
-
69
-
70
-
71
-
72
-
73
-
74
-
75
-
76
-
77
-
78
-
79
-
80
-
81
-
82
-
83
-
84
-
85
-
86
-
87
-
88
-
89
-
90
-
91
-
92
-
93
-
94
-
95
-
96
-
97
-
98
-
99
-
100
-
101
-
102
-
103
-
104
-
105
-
106
-
107
-
108
-
109
-
110
-
111
-
112
-
113
-
114
-
115
-
116
-
117
-
118
-
119
-
120
-
121
-
122
-
123
-
124
-
125
-
126
-
127
-
128
-
129
-
130
-
131
-
132
-
133
 |
 |
