Lantronix Spider Lantronix Spider / SpiderDuo - User Guide - Page 72
Floppy Image, Virtual Media, Active Image, Virtual Media Active Image, Reactivate, Unset, Download
 |
View all Lantronix Spider manuals
Add to My Manuals
Save this manual to your list of manuals |
Page 72 highlights
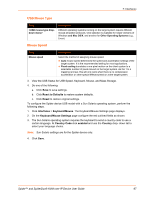
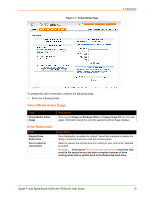
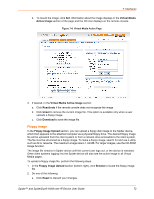
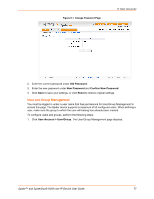
7: Interfaces b. To mount the image, click Set. Information about the image displays in the Virtual Media Active Image section of the page and the CD icon displays on the remote console. Figure 7-8 Virtual Media Active Page 3. If desired, in the Virtual Media Active Image section: a. Click Reactivate if the remote console does not recognize the image. b. Click Unset to remove the current image file. This option is available only when a user uploads a floppy image. c. Click Download to save the image file. Floppy Image In the Floppy Image Upload section, you can upload a floppy disk image to the Spider device, which then appears to the attached computer as a physical floppy drive. The desired floppy image file will be uploaded from the client system or from a network drive accessible to the client system. The file must be structured as a floppy image. To make a floppy image, search for and use a utility such as dd or rawwrite. The maximum image size is 1.44 MB. For larger images, use the CD-ROM Image function. The image file remains in Spider device until the current user logs out, or the device is rebooted. Other client systems logging into the Spider device will also see the active image in all Virtual Media pages. To upload a floppy image file, perform the following steps. 1. In the Floppy Image Upload section (bottom right), click Browse to locate the floppy image file. 2. Do one of the following: a. Click Reset to discard your changes. Spider™ and SpiderDuo® KVM-over-IP Device User Guide 72
-
 1
1 -
2
-
3
-
4
-
5
-
6
-
7
-
8
-
9
-
10
-
11
-
12
-
13
-
14
-
15
-
16
-
17
-
18
-
19
-
20
-
21
-
22
-
23
-
24
-
25
-
26
-
27
-
28
-
29
-
30
-
31
-
32
-
33
-
34
-
35
-
36
-
37
-
38
-
39
-
40
-
41
-
42
-
43
-
44
-
45
-
46
-
47
-
48
-
49
-
50
-
51
-
52
-
53
-
54
-
55
-
56
-
57
-
58
-
59
-
60
-
61
-
62
-
63
-
64
-
65
-
66
-
 67
67 -
 68
68 -
 69
69 -
 70
70 -
 71
71 -
 72
72 -
 73
73 -
 74
74 -
 75
75 -
 76
76 -
 77
77 -
78
-
79
-
80
-
81
-
82
-
83
-
84
-
85
-
86
-
87
-
88
-
89
-
90
-
91
-
92
-
93
-
94
-
95
-
96
-
97
-
98
-
99
-
100
-
101
-
102
-
103
-
104
-
105
-
106
-
107
-
108
-
109
-
110
-
111
-
112
-
113
-
114
-
115
-
116
-
117
-
118
-
119
-
120
-
121
-
122
-
123
-
124
-
125
-
126
-
127
-
128
-
129
-
130
-
131
-
132
-
133
 |
 |
