Lenovo ThinkPad 320 (English) User Guide - Page 104
Replacing the SIM card, slot, and no further installation is needed.
 |
View all Lenovo ThinkPad 320 manuals
Add to My Manuals
Save this manual to your list of manuals |
Page 104 highlights
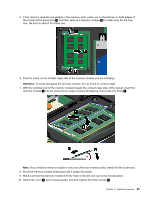
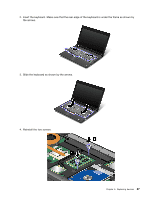
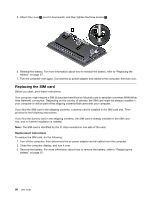
5. Attach the cover 1 , pivot it downwards, and then tighten the three screws 2 . 6. Reinstall the battery. For more information about how to reinstall the battery, refer to "Replacing the battery" on page 67. 7. Turn the computer over again. Connect the ac power adapter and cables to the computer; then turn it on. Replacing the SIM card Before you start, print these instructions. Your computer might require a SIM (Subscriber Identification Module) card to establish a wireless WAN (Wide Area Network) connection. Depending on the country of delivery, the SIM card might be already installed in your computer or will be part of the shipping contents that came with your computer. If you find the SIM card in the shipping contents, a dummy card is installed in the SIM card slot. Then proceed to the following instructions. If you find the dummy card in the shipping contents, the SIM card is already installed in the SIM card slot, and no further installation is needed. Note: The SIM card is identified by the IC chip mounted on one side of the card. Replacement instructions To replace the SIM card, do the following: 1. Turn off the computer; then disconnect the ac power adapter and all cables from the computer. 2. Close the computer display, and turn it over. 3. Remove the battery. For more information about how to remove the battery, refer to "Replacing the battery" on page 67. 88 User Guide
-
 1
1 -
2
-
3
-
4
-
5
-
6
-
7
-
8
-
9
-
10
-
11
-
12
-
13
-
14
-
15
-
16
-
17
-
18
-
19
-
20
-
21
-
22
-
23
-
24
-
25
-
26
-
27
-
28
-
29
-
30
-
31
-
32
-
33
-
34
-
35
-
36
-
37
-
38
-
39
-
40
-
41
-
42
-
43
-
44
-
45
-
46
-
47
-
48
-
49
-
50
-
51
-
52
-
53
-
54
-
55
-
56
-
57
-
58
-
59
-
60
-
61
-
62
-
63
-
64
-
65
-
66
-
67
-
68
-
69
-
70
-
71
-
72
-
73
-
74
-
75
-
76
-
77
-
78
-
79
-
80
-
81
-
82
-
83
-
84
-
85
-
86
-
87
-
88
-
89
-
90
-
91
-
92
-
93
-
94
-
95
-
96
-
97
-
98
-
 99
99 -
 100
100 -
 101
101 -
 102
102 -
 103
103 -
 104
104 -
 105
105 -
 106
106 -
 107
107 -
 108
108 -
 109
109 -
110
-
111
-
112
-
113
-
114
-
115
-
116
-
117
-
118
-
119
-
120
-
121
-
122
-
123
-
124
-
125
-
126
-
127
-
128
-
129
-
130
-
131
-
132
-
133
-
134
-
135
-
136
-
137
-
138
-
139
-
140
-
141
-
142
-
143
-
144
-
145
-
146
-
147
-
148
-
149
-
150
-
151
-
152
-
153
-
154
-
155
-
156
-
157
-
158
-
159
-
160
-
161
-
162
-
163
-
164
-
165
-
166
-
167
-
168
-
169
-
170
-
171
-
172
-
173
-
174
-
175
-
176
-
177
-
178
 |
 |
