Lenovo ThinkPad 320 (English) User Guide - Page 87
Remove the hard disk drive or solid state drive by lifting its upper side.
 |
View all Lenovo ThinkPad 320 manuals
Add to My Manuals
Save this manual to your list of manuals |
Page 87 highlights
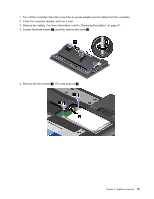
6. Remove the hard disk drive or solid state drive by lifting its upper side. 7. Place the new hard disk drive or solid state drive from the lower side as shown in the picture. 8. Install the new hard disk drive or solid state drive in the direction shown by the arrow 1 and tighten the screw 2 . Chapter 6. Replacing devices 71
-
 1
1 -
2
-
3
-
4
-
5
-
6
-
7
-
8
-
9
-
10
-
11
-
12
-
13
-
14
-
15
-
16
-
17
-
18
-
19
-
20
-
21
-
22
-
23
-
24
-
25
-
26
-
27
-
28
-
29
-
30
-
31
-
32
-
33
-
34
-
35
-
36
-
37
-
38
-
39
-
40
-
41
-
42
-
43
-
44
-
45
-
46
-
47
-
48
-
49
-
50
-
51
-
52
-
53
-
54
-
55
-
56
-
57
-
58
-
59
-
60
-
61
-
62
-
63
-
64
-
65
-
66
-
67
-
68
-
69
-
70
-
71
-
72
-
73
-
74
-
75
-
76
-
77
-
78
-
79
-
80
-
81
-
 82
82 -
 83
83 -
 84
84 -
 85
85 -
 86
86 -
 87
87 -
 88
88 -
 89
89 -
 90
90 -
 91
91 -
 92
92 -
93
-
94
-
95
-
96
-
97
-
98
-
99
-
100
-
101
-
102
-
103
-
104
-
105
-
106
-
107
-
108
-
109
-
110
-
111
-
112
-
113
-
114
-
115
-
116
-
117
-
118
-
119
-
120
-
121
-
122
-
123
-
124
-
125
-
126
-
127
-
128
-
129
-
130
-
131
-
132
-
133
-
134
-
135
-
136
-
137
-
138
-
139
-
140
-
141
-
142
-
143
-
144
-
145
-
146
-
147
-
148
-
149
-
150
-
151
-
152
-
153
-
154
-
155
-
156
-
157
-
158
-
159
-
160
-
161
-
162
-
163
-
164
-
165
-
166
-
167
-
168
-
169
-
170
-
171
-
172
-
173
-
174
-
175
-
176
-
177
-
178
 |
 |

6. Remove the hard disk drive or solid state drive by lifting its upper side.
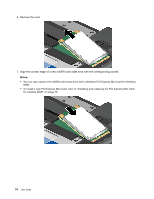
7. Place the new hard disk drive or solid state drive from the lower side as shown in the picture.
8. Install the new hard disk drive or solid state drive in the direction shown by the arrow
1
and tighten
the screw
2
.
Chapter 6
.
Replacing devices
71