Lenovo ThinkServer RD240 (English) Installation and User Guide - Page 103
Accessing the SAS Topology window, Configuring the Gigabit Ethernet controller
 |
View all Lenovo ThinkServer RD240 manuals
Add to My Manuals
Save this manual to your list of manuals |
Page 103 highlights
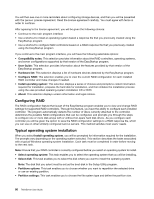
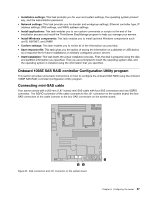
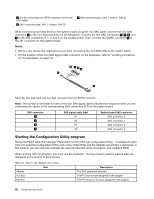
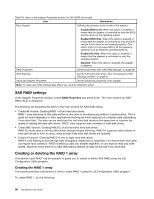
1. In the SAS RAID setup main window, select Create IM Volume and press Enter. The Create New Array window opens. 2. Select No under the RAID Disk column for the first hard disk drive. Then, press the Space key. 3. When prompted, select M to set the first hard disk drive as the primary hard disk drive. Note: If you want to set the first hard disk drive as the slave hard disk drive, select D. 4. Press M to go back to the Create New Array window. Select No under the RAID Disk column for the second hard disk drive. Then, press the Space key and a warning message will be displayed. Press the Space key to go back to the Create New Array window. 5. Press C to create the array and select Save changes then exit this menu when prompted to save changes and exit. 6. After creating the array, you can select RAID Properties in the Adapter Properties window and press Enter to access the SAS RAID configuration main window and view the array information. Deleting the RAID 1 array This section provides instructions on how to delete a RAID array (RAID 1) you have created using the LSI Configuration Utility program. To delete a RAID array (RAID 1), do the following: 1. Select RAID Properties in the Adapter Properties window and press Enter to access the SAS RAID configuration main window and view the array information. 2. Select Manage Array in the View Array window. Then, the Manage Array window opens. 3. Select Delete Array in the Manage Array window and press Enter. When the message for confirmation is displayed, press Y. The array is deleted. Accessing the SAS Topology window This section provides instructions on how to access the SAS Topology window. To access the SAS Topology window, do the following: 1. Select SAS Topology in the Adapter Properties window and press Enter. The SAS Topology window opens. 2. Select Direct Attached Devices in the SAS Topology window and press Enter to view the information. 3. Follow the instructions on the screen to perform other tasks. The keys used to perform various tasks are displayed at the bottom of each screen. Configuring the Gigabit Ethernet controller The Ethernet controllers are integrated on the system board. They provides an interface for connecting to a 10 Mbps, 100 Mbps, or 1 Gbps network and provides full-duplex (FDX) capability, which enables simultaneous transmission and reception of data on the network. If the Ethernet ports in the server supports auto-negotiation, the controllers detect the data-transfer rate (10BASE-T, 100BASE-TX, or 1000BASE-T) and duplex mode (full-duplex or half-duplex) of the network and automatically operates at that rate and mode. You do not have to set any jumpers or configure the controllers. However, you must install a device driver to enable the operating system to address the controllers. Chapter 6. Configuring the server 91
-
 1
1 -
2
-
3
-
4
-
5
-
6
-
7
-
8
-
9
-
10
-
11
-
12
-
13
-
14
-
15
-
16
-
17
-
18
-
19
-
20
-
21
-
22
-
23
-
24
-
25
-
26
-
27
-
28
-
29
-
30
-
31
-
32
-
33
-
34
-
35
-
36
-
37
-
38
-
39
-
40
-
41
-
42
-
43
-
44
-
45
-
46
-
47
-
48
-
49
-
50
-
51
-
52
-
53
-
54
-
55
-
56
-
57
-
58
-
59
-
60
-
61
-
62
-
63
-
64
-
65
-
66
-
67
-
68
-
69
-
70
-
71
-
72
-
73
-
74
-
75
-
76
-
77
-
78
-
79
-
80
-
81
-
82
-
83
-
84
-
85
-
86
-
87
-
88
-
89
-
90
-
91
-
92
-
93
-
94
-
95
-
96
-
97
-
 98
98 -
 99
99 -
 100
100 -
 101
101 -
 102
102 -
 103
103 -
 104
104 -
 105
105 -
 106
106 -
 107
107 -
 108
108 -
109
-
110
-
111
-
112
-
113
-
114
-
115
-
116
-
117
-
118
-
119
-
120
-
121
-
122
-
123
-
124
-
125
-
126
-
127
-
128
-
129
-
130
-
131
-
132
-
133
-
134
-
135
-
136
-
137
-
138
-
139
-
140
 |
 |
