Lenovo ThinkStation C20 (English) User Guide - Page 30
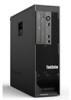
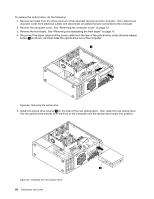
touch the circuit board, on the bracket with the corresponding holes in the hard disk drive. Do
 |
View all Lenovo ThinkStation C20 manuals
Add to My Manuals
Save this manual to your list of manuals |
Page 30 highlights
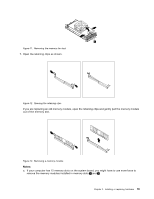
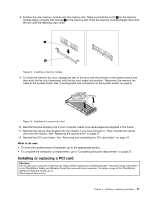
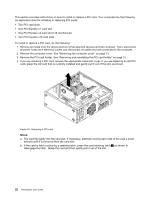
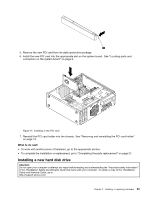
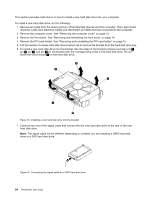
This section provides instructions on how to install a new hard disk drive into your computer. To install a new hard disk drive, do the following: 1. Remove all media from the drives and turn off all attached devices and the computer. Then, disconnect all power cords from electrical outlets and disconnect all cables that are connected to the computer. 2. Remove the computer cover. See "Removing the computer cover" on page 13. 3. Remove the front bezel. See "Removing and reinstalling the front bezel" on page 14. 4. Remove the PCI card holder. See "Removing and reinstalling the PCI card holder" on page 15. 5. Pull the handle of a spare hard disk drive bracket out to remove the bracket from the hard disk drive bay. 6. To install a new hard disk drive into the bracket, flex the sides of the bracket properly and align pin 1 , pin 2 , pin 3 , and pin 4 on the bracket with the corresponding holes in the hard disk drive. Do not touch the circuit board 5 on the hard disk drive. Figure 18. Installing a new hard disk drive into the bracket 7. Connect one end of the signal cable that comes with the new hard disk drive to the rear of the new hard disk drive. Note: The signal cable will be different depending on whether you are installing a SATA hard disk drive or a SAS hard disk drive. Figure 19. Connecting the signal cable to a SATA hard disk drive 24 ThinkStation User Guide
-
 1
1 -
2
-
3
-
4
-
5
-
6
-
7
-
8
-
9
-
10
-
11
-
12
-
13
-
14
-
15
-
16
-
17
-
18
-
19
-
20
-
21
-
22
-
23
-
24
-
 25
25 -
 26
26 -
 27
27 -
 28
28 -
 29
29 -
 30
30 -
 31
31 -
 32
32 -
 33
33 -
 34
34 -
 35
35 -
36
-
37
-
38
-
39
-
40
-
41
-
42
-
43
-
44
-
45
-
46
-
47
-
48
-
49
-
50
-
51
-
52
-
53
-
54
-
55
-
56
-
57
-
58
-
59
-
60
-
61
-
62
-
63
-
64
-
65
-
66
-
67
-
68
-
69
-
70
-
71
-
72
-
73
-
74
-
75
-
76
-
77
-
78
-
79
-
80
-
81
-
82
-
83
-
84
-
85
-
86
-
87
-
88
-
89
-
90
-
91
-
92
 |
 |