Lexmark CS331 Users Guide PDF - Page 20
Setting up and using the home screen applications, Creating a Cloud Connector profile
 |
View all Lexmark CS331 manuals
Add to My Manuals
Save this manual to your list of manuals |
Page 20 highlights
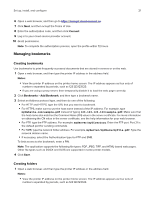
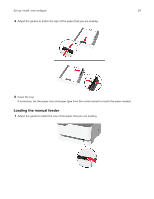
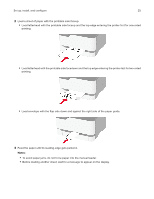
Set up, install, and configure 20 4 Align the printer with the optional tray, and then lower the printer into place. CAUTION-POTENTIAL INJURY: If the printer weight is greater than 20 kg (44 lb), then it may require two or more people to lift it safely. 5 Connect the power cord to the printer, and then to the electrical outlet. CAUTION-POTENTIAL INJURY: To avoid the risk of fire or electrical shock, connect the power cord to an appropriately rated and properly grounded electrical outlet that is near the product and easily accessible. 6 Turn on the printer. Add the tray in the print driver to make it available for print jobs. For more information, see "Adding available options in the print driver" on page 27. Setting up and using the home screen applications This feature is available only in some printer models. Creating a Cloud Connector profile 1 From the home screen, touch Cloud Connector. 2 Select a cloud service provider. 3 Touch Create or . 4 Type a unique profile name. Note: We recommend creating a PIN to protect the profile. 5 Touch OK, and then take note of the authorization code. Note: The authorization code is valid only for 24 hours.
-
 1
1 -
2
-
3
-
4
-
5
-
6
-
7
-
8
-
9
-
10
-
11
-
12
-
13
-
14
-
 15
15 -
 16
16 -
 17
17 -
 18
18 -
 19
19 -
 20
20 -
 21
21 -
 22
22 -
 23
23 -
 24
24 -
 25
25 -
26
-
27
-
28
-
29
-
30
-
31
-
32
-
33
-
34
-
35
-
36
-
37
-
38
-
39
-
40
-
41
-
42
-
43
-
44
-
45
-
46
-
47
-
48
-
49
-
50
-
51
-
52
-
53
-
54
-
55
-
56
-
57
-
58
-
59
-
60
-
61
-
62
-
63
-
64
-
65
-
66
-
67
-
68
-
69
-
70
-
71
-
72
-
73
-
74
-
75
-
76
-
77
-
78
-
79
-
80
-
81
-
82
-
83
-
84
-
85
-
86
-
87
-
88
-
89
-
90
-
91
-
92
-
93
-
94
-
95
-
96
-
97
-
98
-
99
-
100
-
101
-
102
-
103
-
104
-
105
-
106
-
107
-
108
-
109
-
110
-
111
-
112
-
113
-
114
-
115
-
116
-
117
-
118
-
119
-
120
-
121
-
122
-
123
-
124
-
125
-
126
-
127
-
128
-
129
-
130
-
131
-
132
-
133
-
134
-
135
-
136
-
137
-
138
-
139
-
140
-
141
-
142
-
143
-
144
-
145
-
146
-
147
-
148
-
149
-
150
-
151
-
152
-
153
-
154
-
155
-
156
 |
 |
