Lexmark E210 Online Information - Page 26
Make your own Diskette set of software
 |
UPC - 734646229807
View all Lexmark E210 manuals
Add to My Manuals
Save this manual to your list of manuals |
Page 26 highlights
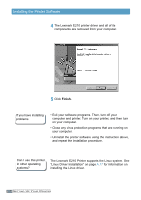
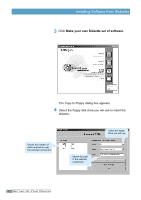
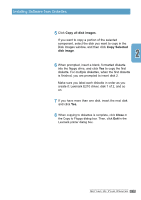
Installing Software from Diskettes 3 Click Make your own Diskette set of software. The Copy to Floppy dialog box appears. 4 Select the floppy disk drive you will use to insert the diskette. Shows the number of disks required to copy the selected component. Shows the path of the selected component. Select the floppy drive you will use. 2.16 SETTING UP YOUR PRINTER
-
 1
1 -
2
-
3
-
4
-
5
-
6
-
7
-
8
-
9
-
10
-
11
-
12
-
13
-
14
-
15
-
16
-
17
-
18
-
19
-
20
-
 21
21 -
 22
22 -
 23
23 -
 24
24 -
 25
25 -
 26
26 -
 27
27 -
 28
28 -
 29
29 -
 30
30 -
 31
31 -
32
-
33
-
34
-
35
-
36
-
37
-
38
-
39
-
40
-
41
-
42
-
43
-
44
-
45
-
46
-
47
-
48
-
49
-
50
-
51
-
52
-
53
-
54
-
55
-
56
-
57
-
58
-
59
-
60
-
61
-
62
-
63
-
64
-
65
-
66
-
67
-
68
-
69
-
70
-
71
-
72
-
73
-
74
-
75
-
76
-
77
-
78
-
79
-
80
-
81
-
82
-
83
-
84
-
85
-
86
-
87
-
88
-
89
-
90
-
91
-
92
-
93
-
94
-
95
-
96
-
97
-
98
-
99
-
100
-
101
-
102
-
103
-
104
-
105
-
106
-
107
-
108
-
109
-
110
-
111
-
112
-
113
-
114
-
115
-
116
-
117
-
118
-
119
-
120
-
121
-
122
-
123
-
124
-
125
-
126
-
127
-
128
-
129
-
130
-
131
-
132
-
133
-
134
-
135
-
136
-
137
 |
 |

2.
16
S
ETTING
U
P
Y
OUR
P
RINTER
The Copy to Floppy dialog box appears.
4
Select the floppy disk drive you will use to insert the
diskette.
Shows the path
of the selected
component.
Shows the number of
disks required to copy
the selected component.
Select the floppy
drive you will use.
Installing Software from Diskettes
3
Click
Make your own Diskette set of software.