Lexmark E210 Online Information - Page 99
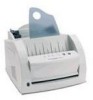
Gray background, Toner smear, Vertical repetitive, defects, Problem, Solution
 |
UPC - 734646229807
View all Lexmark E210 manuals
Add to My Manuals
Save this manual to your list of manuals |
Page 99 highlights
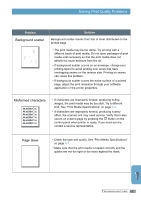
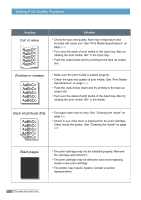
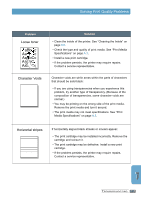
aBbCc aBbCc aBbCc aBbCc aBbCc Solving Print Quality Problems AaBbCc AaBbCc AaBbCc AaBbCc AaPrBobblCemc Solution AaBbCc AaBbCc AaBbCc AaBbCc AaBbCc Gray background AaBbCc AaBbCc AaBbCc AaBbCc AaBbCc If the amount of background toner shading becomes unacceptable, the following procedures may clear the condition: • Change the print media to a lighter basis weight. See "Print Media Specifications" on page A.3. • Check the printer environment; very dry (low humidity) or high humidity (higheAr thaaBnb8C0%crelative humidity) conditions can increase the amAouanBt obf Cbackground shading. • Install a new print caArtraidBgeb. Cc AaBbCc AaBbCc Toner smear Vertical repetitive defects AaBbCc AaBbCc AaBbCc AaBbCc AaBbCc • Clean the inside of the printer. See "Cleaning the Inside" on page 6.6. • Check the type and quality. See "Print Media Specifications" on page A.3. • Install a new print cartridge. AaBbCc AaBbCc AaBbCc AaBbCc AaBbCc If marks repeatedly appear on the printed side of the page at even intervals: • The print cartridge may be damaged. If a repetitive mark occurs every 95 mm or 38 mm on the page, print a cleaning sheet several times to clean the cartridge (see "Printing a Cleaning Sheet" on page 6.8). After the printout, if you still have the same problems, install a new print cartridge. • Parts in the printer may have toner on them. If the defects occur on the back of the page, the problem corrects itself after a few more pages. • The fusing assembly may be damaged. Contact a service representative. 7.14 TROUBLESHOOTING
-
 1
1 -
2
-
3
-
4
-
5
-
6
-
7
-
8
-
9
-
10
-
11
-
12
-
13
-
14
-
15
-
16
-
17
-
18
-
19
-
20
-
21
-
22
-
23
-
24
-
25
-
26
-
27
-
28
-
29
-
30
-
31
-
32
-
33
-
34
-
35
-
36
-
37
-
38
-
39
-
40
-
41
-
42
-
43
-
44
-
45
-
46
-
47
-
48
-
49
-
50
-
51
-
52
-
53
-
54
-
55
-
56
-
57
-
58
-
59
-
60
-
61
-
62
-
63
-
64
-
65
-
66
-
67
-
68
-
69
-
70
-
71
-
72
-
73
-
74
-
75
-
76
-
77
-
78
-
79
-
80
-
81
-
82
-
83
-
84
-
85
-
86
-
87
-
88
-
89
-
90
-
91
-
92
-
93
-
 94
94 -
 95
95 -
 96
96 -
 97
97 -
 98
98 -
 99
99 -
 100
100 -
 101
101 -
 102
102 -
 103
103 -
 104
104 -
105
-
106
-
107
-
108
-
109
-
110
-
111
-
112
-
113
-
114
-
115
-
116
-
117
-
118
-
119
-
120
-
121
-
122
-
123
-
124
-
125
-
126
-
127
-
128
-
129
-
130
-
131
-
132
-
133
-
134
-
135
-
136
-
137
 |
 |
