Lexmark Network Printer Device Getting Started - Page 29
Select the network printer port (Windows
 |
View all Lexmark Network Printer Device manuals
Add to My Manuals
Save this manual to your list of manuals |
Page 29 highlights
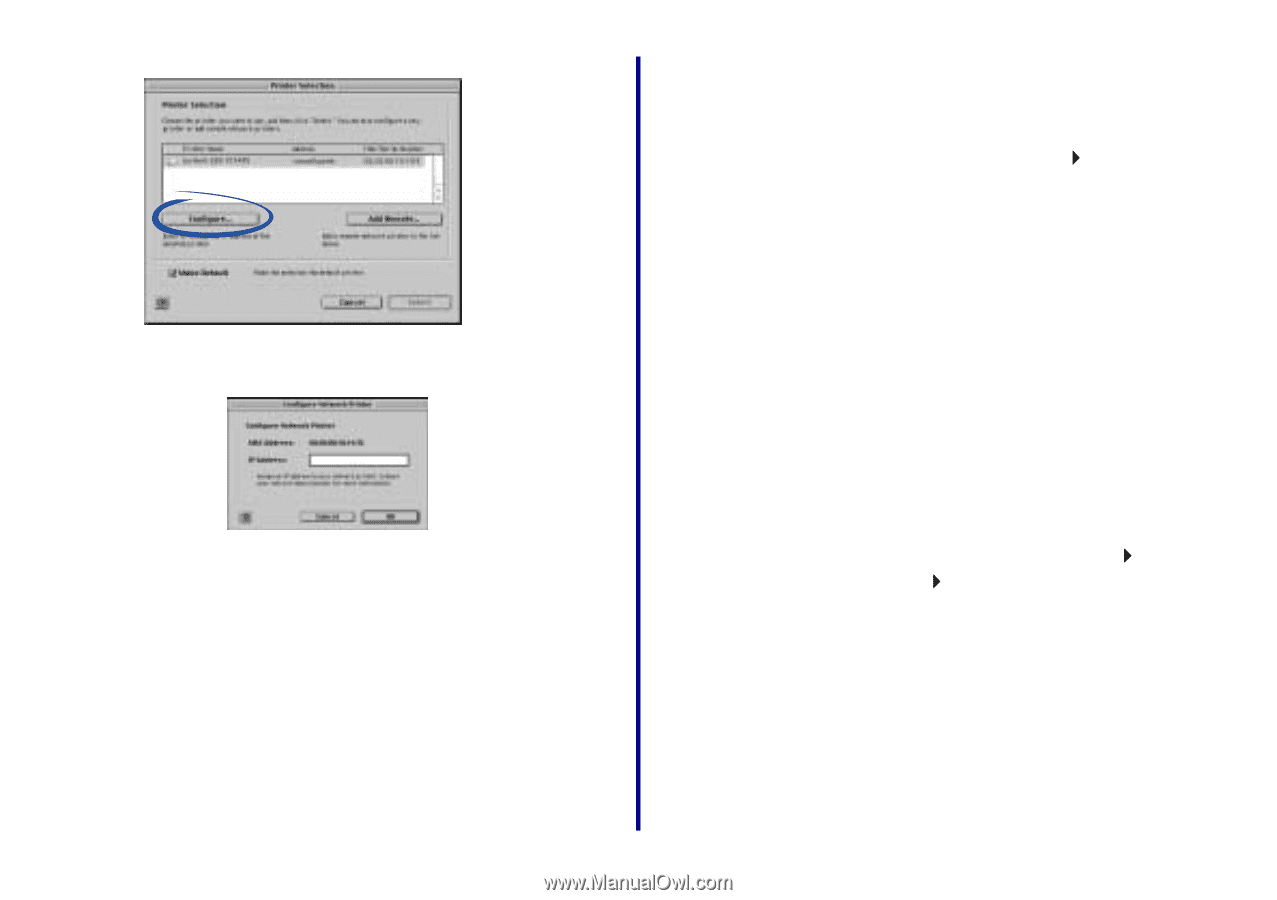
2 Click Configure. Select the network printer port (Windows) 3 From the Configure Network Printer screen, enter an IP address that is valid for your network. For help, refer to your network documentation or contact your network administrator. 4 Click OK. The Configure Network Printer screen disappears and the Printer Selection screen becomes the active screen again. In addition, the newly configured printer is automatically selected. 5 Continue with step 3b on page 12 (Mac OS 8.6 to 9.2) or step 4b on page 14 (Mac OS X 10.0.3 to 10.1). Windows 98/Me/2000 1 From the Start menu, click Settings Printers. 2 From the Printers folder, right-click the icon for your network printer. 3 Click Properties. 4 Click the Details or Port tab. 5 From the pull-down menu labeled Print to the following port:, select the printer port that consists of the printer name followed by the last six characters of the adapter MAC address (for example, Lexmark_Z65_1008e8). 6 Click OK. Windows XP 1 From the Start menu, click Control Panel Printers and Other Hardware Printers and Faxes. 2 Click the Ports tab. 3 From the list of ports, select the one that consists of the printer name followed by the last six characters of the adapter MAC address (for example, Lexmark_Z65_1008e8). 4 Click Apply. 5 Click OK. 25 Getting Started
-
 1
1 -
2
-
3
-
4
-
5
-
6
-
7
-
8
-
9
-
10
-
11
-
12
-
13
-
14
-
15
-
16
-
17
-
18
-
19
-
20
-
21
-
22
-
23
-
 24
24 -
 25
25 -
 26
26 -
 27
27 -
 28
28 -
 29
29 -
 30
30 -
 31
31 -
 32
32 -
 33
33 -
 34
34 -
35
-
36
-
37
 |
 |