Lexmark Network Printer Device Getting Started - Page 32
Change adapter switch settings, 100MB, Full Duplex
 |
View all Lexmark Network Printer Device manuals
Add to My Manuals
Save this manual to your list of manuals |
Page 32 highlights
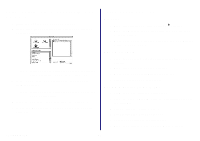
To relocate your adapter to a different network: 1 Disconnect the adapter from the original network. 1 Unplug the adapter power supply. 2 Position the switches as outlined in the following table. Note: The Ethernet cable connects the adapter to the network. For help disconnecting the Ethernet cable, see page 29. 2 Unplug the adapter power supply. 3 Complete the hardware setup, software installation, and configuration for your printer and adapter on the new network. For help, see Steps 1 through 9 on pages 2 through 6. Note: The switches shown in the illustration are all in the up (OFF) position. To change a switch to the down (ON) position, use a narrow pointed object (for example, an ink pen). Switch 1 Switch 2 Switch 3 Function down down down Auto negotiation with DHCP (default) Change adapter switch settings These instructions are provided for use by a network administrator only. down down down up up up down up up down down up up down up down up down Auto negotiation without DHCP Reset IP address to default (157.184.0.1) Not defined 100MB, Full Duplex 100MB, Half Duplex 10MB, Full Duplex up up up 10MB, Half Duplex The default settings of your adapter switches facilitate automatic configuration on most networks. However, if it is necessary to change your adapter switch settings, follow these steps: Getting Started 28
-
 1
1 -
2
-
3
-
4
-
5
-
6
-
7
-
8
-
9
-
10
-
11
-
12
-
13
-
14
-
15
-
16
-
17
-
18
-
19
-
20
-
21
-
22
-
23
-
24
-
25
-
26
-
 27
27 -
 28
28 -
 29
29 -
 30
30 -
 31
31 -
 32
32 -
 33
33 -
 34
34 -
 35
35 -
 36
36 -
 37
37
 |
 |