Lexmark X7500 Setup Guide - Page 23
Turning on the control, he control, unit and printer, d printer
 |
UPC - 734646391306
View all Lexmark X7500 manuals
Add to My Manuals
Save this manual to your list of manuals |
Page 23 highlights
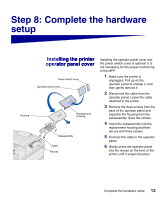
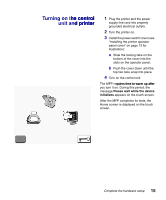
Turning on the control unit and printer 1 Plug the printer and the power supply line cord into properly grounded electrical outlets. 2 Turn the printer on. 3 Install the power switch cover (see "Installing the printer operator panel cover" on page 13 for illustration): a Slide the locking tabs on the bottom of the cover into the slots on the operator panel, b Push the cover down until the top two tabs snap into place. 4 Turn on the control unit. The MFP requires time to warm up after you turn it on. During this period, the message Please wait while the device initializes appears on the touch screen. After the MFP completes its tests, the Home screen is displayed on the touch screen. Complete the hardware setup 15
-
 1
1 -
2
-
3
-
4
-
5
-
6
-
7
-
8
-
9
-
10
-
11
-
12
-
13
-
14
-
15
-
16
-
17
-
 18
18 -
 19
19 -
 20
20 -
 21
21 -
 22
22 -
 23
23 -
 24
24 -
 25
25 -
 26
26 -
 27
27 -
 28
28 -
29
-
30
-
31
-
32
-
33
-
34
-
35
-
36
-
37
-
38
-
39
-
40
-
41
-
42
-
43
-
44
-
45
-
46
-
47
-
48
-
49
-
50
-
51
-
52
-
53
-
54
-
55
-
56
-
57
-
58
-
59
-
60
-
61
-
62
-
63
-
64
-
65
-
66
-
67
-
68
-
69
-
70
-
71
-
72
-
73
-
74
-
75
-
76
-
77
-
78
-
79
-
80
-
81
-
82
-
83
-
84
-
85
-
86
-
87
-
88
-
89
-
90
-
91
-
92
-
93
-
94
-
95
-
96
-
97
-
98
-
99
-
100
-
101
-
102
-
103
-
104
-
105
-
106
-
107
-
108
-
109
-
110
-
111
-
112
-
113
-
114
-
115
-
116
-
117
-
118
-
119
-
120
-
121
-
122
-
123
-
124
-
125
-
126
-
127
-
128
-
129
-
130
-
131
-
132
-
133
-
134
-
135
-
136
-
137
-
138
-
139
-
140
-
141
-
142
-
143
-
144
-
145
-
146
-
147
-
148
-
149
-
150
-
151
-
152
-
153
-
154
-
155
-
156
-
157
-
158
-
159
-
160
-
161
-
162
-
163
-
164
-
165
-
166
-
167
-
168
-
169
-
170
-
171
-
172
-
173
-
174
-
175
-
176
-
177
-
178
-
179
-
180
-
181
-
182
-
183
-
184
-
185
-
186
-
187
-
188
-
189
-
190
-
191
-
192
-
193
-
194
-
195
-
196
-
197
-
198
-
199
-
200
-
201
-
202
-
203
-
204
-
205
-
206
-
207
-
208
-
209
-
210
-
211
-
212
-
213
-
214
-
215
-
216
-
217
-
218
-
219
-
220
-
221
-
222
-
223
-
224
-
225
-
226
-
227
-
228
-
229
-
230
-
231
-
232
-
233
-
234
-
235
-
236
-
237
-
238
-
239
-
240
-
241
-
242
-
243
-
244
-
245
-
246
-
247
-
248
-
249
-
250
-
251
 |
 |

15
Complete the hardware setup
Turning on the control
he control
unit and printer
d printer
1
Plug the printer and the power
supply line cord into properly
grounded electrical outlets.
2
Turn the printer on.
3
Install the power switch cover (see
“
Installing the printer operator
panel cover
”
on page 13 for
illustration):
a
Slide the locking tabs on the
bottom of the cover into the
slots on the operator panel,
b
Push the cover down until the
top two tabs
snap
into place.
4
Turn on the control unit.
The MFP requires time to warm up after
quires time to warm up after
you turn it on. During this period, the
message
Please wait while the device
initializes
appears on the touch screen.
After the MFP completes its tests, the
Home screen is displayed on the touch
screen.