Lexmark X7500 Setup Guide - Page 25
Configuring, figuring, Fax Setup, Setup
 |
UPC - 734646391306
View all Lexmark X7500 manuals
Add to My Manuals
Save this manual to your list of manuals |
Page 25 highlights
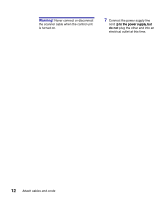
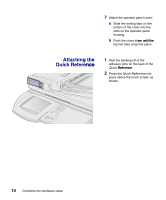
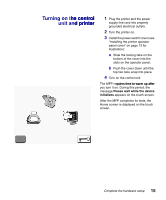
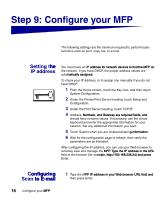
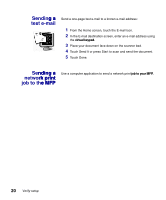
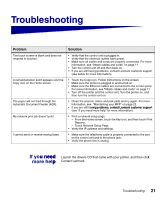
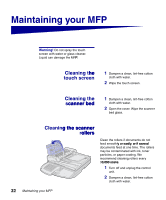
2 Click Configuration. 3 Click Scan to E-mail General Setup. 4 Type the SMTP gateway of your network or Internet service provider in the appropriate field. Specify a default e-mail address for the message reply line. 5 Click Submit. Configuring Fax Setup The Telephone Consumer Protection Act of 1991 requires all outgoing faxes to contain specific information in a margin at the top or bottom of each transmitted page, or on the first page of the transmission. Use your Web browser to set the required fax information: 1 Type the MFP IP address in your browser URL field (for example, http://192.168.236.24), and press Enter. 2 Click Configuration and then click Fax Setup. 3 If Analog doesn't appear in the drop-down menu, select it now. Click Submit. If Analog does appear in the drop-down menu, click Configuration. 4 After the configuration page refreshes, enter the required FCC information: - Station Name (a personal name or company name) - Station Number (the fax phone number) 5 Check the current date and time, and then select the Time Zone, such as Eastern (USA and Canada, Eastern Standard Time). 6 Set or change any additional fax settings. 7 Click Submit. 8 If the current date and time are not correct, click Set Date and Time. Enter the appropriate information, and then click Submit. If you want to configure for the Fax Server mode, return to the Fax Setup configuration page and switch modes. Configure your MFP 17
-
 1
1 -
2
-
3
-
4
-
5
-
6
-
7
-
8
-
9
-
10
-
11
-
12
-
13
-
14
-
15
-
16
-
17
-
18
-
19
-
 20
20 -
 21
21 -
 22
22 -
 23
23 -
 24
24 -
 25
25 -
 26
26 -
 27
27 -
 28
28 -
 29
29 -
 30
30 -
31
-
32
-
33
-
34
-
35
-
36
-
37
-
38
-
39
-
40
-
41
-
42
-
43
-
44
-
45
-
46
-
47
-
48
-
49
-
50
-
51
-
52
-
53
-
54
-
55
-
56
-
57
-
58
-
59
-
60
-
61
-
62
-
63
-
64
-
65
-
66
-
67
-
68
-
69
-
70
-
71
-
72
-
73
-
74
-
75
-
76
-
77
-
78
-
79
-
80
-
81
-
82
-
83
-
84
-
85
-
86
-
87
-
88
-
89
-
90
-
91
-
92
-
93
-
94
-
95
-
96
-
97
-
98
-
99
-
100
-
101
-
102
-
103
-
104
-
105
-
106
-
107
-
108
-
109
-
110
-
111
-
112
-
113
-
114
-
115
-
116
-
117
-
118
-
119
-
120
-
121
-
122
-
123
-
124
-
125
-
126
-
127
-
128
-
129
-
130
-
131
-
132
-
133
-
134
-
135
-
136
-
137
-
138
-
139
-
140
-
141
-
142
-
143
-
144
-
145
-
146
-
147
-
148
-
149
-
150
-
151
-
152
-
153
-
154
-
155
-
156
-
157
-
158
-
159
-
160
-
161
-
162
-
163
-
164
-
165
-
166
-
167
-
168
-
169
-
170
-
171
-
172
-
173
-
174
-
175
-
176
-
177
-
178
-
179
-
180
-
181
-
182
-
183
-
184
-
185
-
186
-
187
-
188
-
189
-
190
-
191
-
192
-
193
-
194
-
195
-
196
-
197
-
198
-
199
-
200
-
201
-
202
-
203
-
204
-
205
-
206
-
207
-
208
-
209
-
210
-
211
-
212
-
213
-
214
-
215
-
216
-
217
-
218
-
219
-
220
-
221
-
222
-
223
-
224
-
225
-
226
-
227
-
228
-
229
-
230
-
231
-
232
-
233
-
234
-
235
-
236
-
237
-
238
-
239
-
240
-
241
-
242
-
243
-
244
-
245
-
246
-
247
-
248
-
249
-
250
-
251
 |
 |