Lexmark X7500 Setup Guide - Page 32
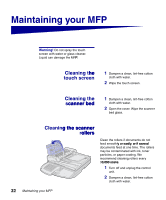
Cleaning the scanner, the scanner, pick pads, k pads
 |
UPC - 734646391306
View all Lexmark X7500 manuals
Add to My Manuals
Save this manual to your list of manuals |
Page 32 highlights
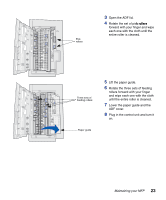
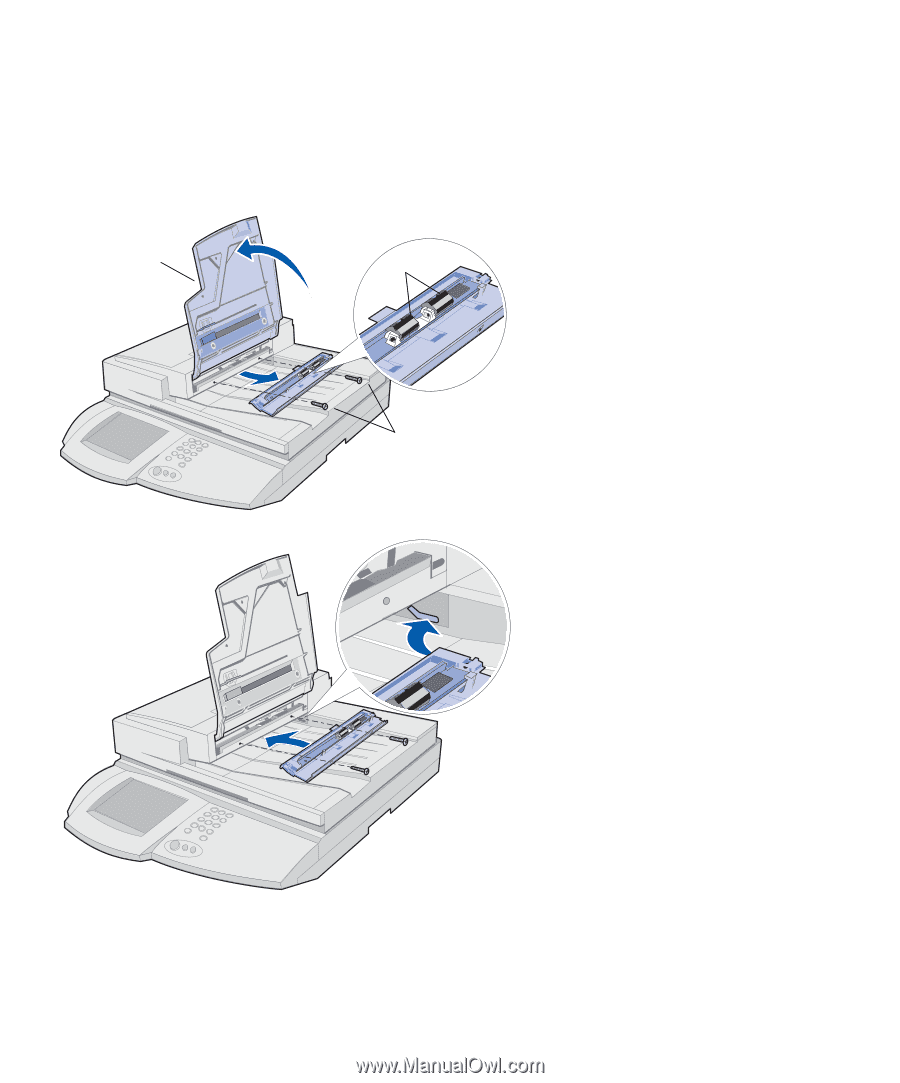
Input tray Cleaning the scanner pick pads Pick pads 1 Lift the input tray. 2 Remove the two screws. 3 Lower the roller plate and pull it straight out. 4 Dampen a clean, lint-free cotton cloth with water. 5 Wipe the two pick pads. Two screws 6 Align the tabs on either side of the roller plate with the grooves inside the paper exit area. 7 Insert the right tab into the right groove, and then slip the left tab into the left groove. 8 Tilt the roller plate up and slanted slightly down on the right side. 9 Slide the plate back until it snaps into place. 10 Install the two screws to secure the plate. For instructions on maintaining the printer, refer to the printer publications CD. 24 Maintaining your MFP
-
 1
1 -
2
-
3
-
4
-
5
-
6
-
7
-
8
-
9
-
10
-
11
-
12
-
13
-
14
-
15
-
16
-
17
-
18
-
19
-
20
-
21
-
22
-
23
-
24
-
25
-
26
-
 27
27 -
 28
28 -
 29
29 -
 30
30 -
 31
31 -
 32
32 -
 33
33 -
 34
34 -
 35
35 -
 36
36 -
 37
37 -
38
-
39
-
40
-
41
-
42
-
43
-
44
-
45
-
46
-
47
-
48
-
49
-
50
-
51
-
52
-
53
-
54
-
55
-
56
-
57
-
58
-
59
-
60
-
61
-
62
-
63
-
64
-
65
-
66
-
67
-
68
-
69
-
70
-
71
-
72
-
73
-
74
-
75
-
76
-
77
-
78
-
79
-
80
-
81
-
82
-
83
-
84
-
85
-
86
-
87
-
88
-
89
-
90
-
91
-
92
-
93
-
94
-
95
-
96
-
97
-
98
-
99
-
100
-
101
-
102
-
103
-
104
-
105
-
106
-
107
-
108
-
109
-
110
-
111
-
112
-
113
-
114
-
115
-
116
-
117
-
118
-
119
-
120
-
121
-
122
-
123
-
124
-
125
-
126
-
127
-
128
-
129
-
130
-
131
-
132
-
133
-
134
-
135
-
136
-
137
-
138
-
139
-
140
-
141
-
142
-
143
-
144
-
145
-
146
-
147
-
148
-
149
-
150
-
151
-
152
-
153
-
154
-
155
-
156
-
157
-
158
-
159
-
160
-
161
-
162
-
163
-
164
-
165
-
166
-
167
-
168
-
169
-
170
-
171
-
172
-
173
-
174
-
175
-
176
-
177
-
178
-
179
-
180
-
181
-
182
-
183
-
184
-
185
-
186
-
187
-
188
-
189
-
190
-
191
-
192
-
193
-
194
-
195
-
196
-
197
-
198
-
199
-
200
-
201
-
202
-
203
-
204
-
205
-
206
-
207
-
208
-
209
-
210
-
211
-
212
-
213
-
214
-
215
-
216
-
217
-
218
-
219
-
220
-
221
-
222
-
223
-
224
-
225
-
226
-
227
-
228
-
229
-
230
-
231
-
232
-
233
-
234
-
235
-
236
-
237
-
238
-
239
-
240
-
241
-
242
-
243
-
244
-
245
-
246
-
247
-
248
-
249
-
250
-
251
 |
 |
24
Maintaining your MFP
Cleaning the scanner
the scanner
pick pads
k pads
1
Lift the input tray.
2
Remove the two screws.
move the two screws.
3
Lower the roller plate and pull it
straight out.
4
Dampen a clean, lint-free cotton
cloth with water.
5
Wipe the two pick pads.
6
Align the tabs on either side of the
roller plate with the grooves inside
the paper exit area.
7
Insert the right tab into the right
groove, and then slip the left tab
into the left groove.
8
Tilt the roller plate up and slanted
slightly down on the right side.
9
Slide the plate back until it
snaps
into place.
10
Install the two screws to secure
the plate.
For instructions on maintaining the
printer, refer to the printer publications
CD.
D.
Input tray
Two screws
Pick pads