Lexmark X9350 User's Guide - Page 29
Using an Ethernet connection, Shared printing, WiFi Protected Access 2 WPA2-PSK - printer software
 |
UPC - 734646091732
View all Lexmark X9350 manuals
Add to My Manuals
Save this manual to your list of manuals |
Page 29 highlights
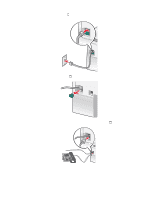
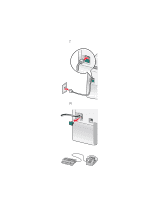
3 Select I agree to the terms of this License Agreement and then click Next. 4 Click Setup Wireless. 5 Connect the printer to the computer using a USB cable. 6 Do one of the following: • Enter the Wireless network SSID, and select the appropriate Wireless Mode. Click Next. or • Select the SSID from the list, and go to step 8. If the SSID is not displayed, click to enter the wireless setting. 7 If prompted, select the type of Security used on the network. Options include: • No security • Wireless Encryption Protocol (WEP) • WiFi Protected Access (WPA) • WiFi Protected Access 2 (WPA2-PSK) 8 Enter the appropriate wireless security key(s) or password, and then click Next. 9 Verify the wireless network settings, and click Next. The configuration is applied to the internal wireless print server, and a network settings confirmation page prints. 10 Select Print using the wireless network connection, and then click Next. 11 Disconnect the USB cable from the printer, and follow the instructions on the computer screen to complete the printer installation. Note: If your printer is already installed, you need to uninstall and then reinstall it. Using an Ethernet connection 1 Make sure the printer is turned off. 2 Connect the Ethernet cable from the printer to the network router, and then turn the printer on. 3 Insert the printer software CD. 4 Select the Network Installation option. 5 Select I agree to the terms of this License Agreement, and then click Next. 6 Select the printer from the list, and then click Next. If there are multiple printers, select the IP or MAC address. 7 Follow the instructions on the computer screen to complete the installation. 8 Assign a name and, if desired, a Personal Identification Number (PIN) to the computer you are using. Click Next. 9 Select the software you want to install. 10 Follow the instructions on the computer screen to complete the printer registration. 11 Click Finished when setup is complete. Note: Repeat steps 3-11 on each computer that you want to print to this printer. Shared printing Sharing the printer on the network (on the host computer) 1 For more information, see the setup information that came with your printer. 2 For Windows 2000: Click Start ª Settings ª Printers. For Windows XP: Click Start ª Printers & Faxes. 29
-
 1
1 -
2
-
3
-
4
-
5
-
6
-
7
-
8
-
9
-
10
-
11
-
12
-
13
-
14
-
15
-
16
-
17
-
18
-
19
-
20
-
21
-
22
-
23
-
 24
24 -
 25
25 -
 26
26 -
 27
27 -
 28
28 -
 29
29 -
 30
30 -
 31
31 -
 32
32 -
 33
33 -
 34
34 -
35
-
36
-
37
-
38
-
39
-
40
-
41
-
42
-
43
-
44
-
45
-
46
-
47
-
48
-
49
-
50
-
51
-
52
-
53
-
54
-
55
-
56
-
57
-
58
-
59
-
60
-
61
-
62
-
63
-
64
-
65
-
66
-
67
-
68
-
69
-
70
-
71
-
72
-
73
-
74
-
75
-
76
-
77
-
78
-
79
-
80
-
81
-
82
-
83
-
84
-
85
-
86
-
87
-
88
-
89
-
90
-
91
-
92
-
93
-
94
-
95
-
96
-
97
-
98
-
99
-
100
-
101
-
102
-
103
-
104
-
105
-
106
-
107
-
108
-
109
-
110
-
111
-
112
-
113
-
114
-
115
-
116
-
117
-
118
-
119
-
120
-
121
-
122
-
123
-
124
-
125
-
126
-
127
-
128
-
129
-
130
-
131
-
132
-
133
-
134
-
135
-
136
-
137
-
138
-
139
-
140
-
141
-
142
-
143
-
144
-
145
-
146
-
147
-
148
-
149
-
150
-
151
-
152
-
153
-
154
-
155
-
156
-
157
-
158
-
159
-
160
-
161
-
162
-
163
-
164
-
165
-
166
-
167
-
168
-
169
-
170
-
171
-
172
-
173
-
174
-
175
-
176
-
177
-
178
-
179
-
180
-
181
-
182
-
183
-
184
-
185
-
186
-
187
-
188
-
189
-
190
-
191
-
192
-
193
-
194
-
195
-
196
-
197
-
198
 |
 |