Lexmark X9350 User's Guide - Page 30
Tips for installing a network printer, Assigning an IP address - windows 8
 |
UPC - 734646091732
View all Lexmark X9350 manuals
Add to My Manuals
Save this manual to your list of manuals |
Page 30 highlights
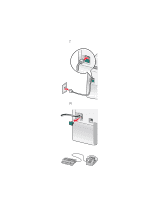
3 Right-click your printer icon, and then select Sharing. 4 For Windows 2000: Click Shared as, and then assign a name to your printer. For Windows XP: Click Share this printer. 5 Follow the directions on the computer screen until installation is complete. Installing the shared printer on other network computers (on the client computers) Using the peer-to-peer method Using the point-and-print method a Move the printer next to the client computer. Connect the telephone cord and power cord, but do not connect the USB cable yet. b Insert the printer software CD. c Select Personal Installation, and then click Next. d Connect one end of the USB cable to the printer, and then connect the other end to the client computer. e Click Cancel on any New Hardware screens. a Go to a network computer that you want to enable to print to the shared printer. b Browse the Network Neighborhood until you find the name of the shared printer assigned in step 4 on page 30. c Right-click the printer icon, and then select Open or Connect. d This will copy a subset of the printer software from the host computer. A printer object will be created in the Printers folder of the client. f Agree to the license agreement, and then click Next. g Select Firewall Settings, and then click Next. h Select Typical or Advanced, and then click Next. i Follow the instructions on the screen to complete installation. When setup is complete, click Finished. j From the computer, access the Printers folder. k Right-click the printer icon. l Click Properties. m Click the Ports tab. n Click Add Ports. o From the list, click Local Port. p Click New port and enter the shared name of the printer as \\server\share. q Click OK on any screens shown until you exit Properties. r Disconnect the USB cable from the printer and client computer. Move the printer back to the host computer and reconnect them using the USB cable. s Repeat this procedure for each computer you want to access the shared printer. Tips for installing a network printer Assigning an IP address An IP address may be assigned by the network using DHCP. The print object, created at the end of the installation, sends all print jobs across the network to the printer using this address. 30
-
 1
1 -
2
-
3
-
4
-
5
-
6
-
7
-
8
-
9
-
10
-
11
-
12
-
13
-
14
-
15
-
16
-
17
-
18
-
19
-
20
-
21
-
22
-
23
-
24
-
 25
25 -
 26
26 -
 27
27 -
 28
28 -
 29
29 -
 30
30 -
 31
31 -
 32
32 -
 33
33 -
 34
34 -
 35
35 -
36
-
37
-
38
-
39
-
40
-
41
-
42
-
43
-
44
-
45
-
46
-
47
-
48
-
49
-
50
-
51
-
52
-
53
-
54
-
55
-
56
-
57
-
58
-
59
-
60
-
61
-
62
-
63
-
64
-
65
-
66
-
67
-
68
-
69
-
70
-
71
-
72
-
73
-
74
-
75
-
76
-
77
-
78
-
79
-
80
-
81
-
82
-
83
-
84
-
85
-
86
-
87
-
88
-
89
-
90
-
91
-
92
-
93
-
94
-
95
-
96
-
97
-
98
-
99
-
100
-
101
-
102
-
103
-
104
-
105
-
106
-
107
-
108
-
109
-
110
-
111
-
112
-
113
-
114
-
115
-
116
-
117
-
118
-
119
-
120
-
121
-
122
-
123
-
124
-
125
-
126
-
127
-
128
-
129
-
130
-
131
-
132
-
133
-
134
-
135
-
136
-
137
-
138
-
139
-
140
-
141
-
142
-
143
-
144
-
145
-
146
-
147
-
148
-
149
-
150
-
151
-
152
-
153
-
154
-
155
-
156
-
157
-
158
-
159
-
160
-
161
-
162
-
163
-
164
-
165
-
166
-
167
-
168
-
169
-
170
-
171
-
172
-
173
-
174
-
175
-
176
-
177
-
178
-
179
-
180
-
181
-
182
-
183
-
184
-
185
-
186
-
187
-
188
-
189
-
190
-
191
-
192
-
193
-
194
-
195
-
196
-
197
-
198
 |
 |
