Lexmark X9350 User's Guide - Page 60
Printing the Print Settings List, Using the Network Setup submenu, Setup, Print Settings List
 |
UPC - 734646091732
View all Lexmark X9350 manuals
Add to My Manuals
Save this manual to your list of manuals |
Page 60 highlights
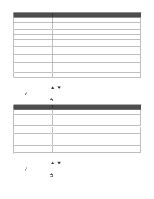
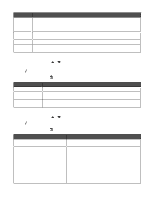
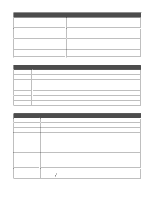
Use this Photo Size Layout Quality Paper Handling To Specify the size of the photo to be printed. Values are Hagaki, L, 2L, 60 x 80 mm, A6, 10 x 15 cm, A5, B5, A4, 13 x18 cm, 3.5 x 5 in., 4 x 6 in., 5 x 7 in., 8 x 10 in., or 8.5 x 11 in.. Note: Automatic is also in the list, but it is not selectable. The value changes to automatic based on the value chosen for Layout. Specify a layout for the photos. Values are Automatic, Borderless (1 Per Page), One Photo Centered, or 1 Per Page through 16 Per Page. Specify to print in Auto, Draft, Normal, or Photo mode. Note: Auto and Photo are good for pictures and paper-based print jobs. Auto is good for printing on transparencies. Change settings related to the loading of paper in the paper tray or trays. For more information, see "Using the Paper Handling submenu" on page 54. Printing the Print Settings List 1 From the Setup menu, press or repeatedly until Print Settings List is highlighted. 2 Press . 3 Press to print a user default settings list which lists the setting in the printer, the value it is set to, and its factory default. Using the Network Setup submenu The Network Setup submenu is listed only if an internal print server is installed. 1 From the Setup menu, press or repeatedly until Network Setup is highlighted. 2 Press . 3 After changing values, press to save these values and exit this submenu. Use this Print Network Setup Page Wireless Menu TCP/IP Network Time Menu To Print a list of network functions. Press to print the list. Press to access the Wireless Setup Menu. For more information, see "Wireless Setup Menu" on page 61. Sets the network option to TCP/IP (Transmission Control Protocol/Internet Protocol). Press to access the TCP/ IP Menu. For more information, see "TCP/IP Menu" on page 61. Set Time Server to either the Enable or Disable value. 1 Press to access the Network Time Menu. 2 Press to save and exit. 60
-
 1
1 -
2
-
3
-
4
-
5
-
6
-
7
-
8
-
9
-
10
-
11
-
12
-
13
-
14
-
15
-
16
-
17
-
18
-
19
-
20
-
21
-
22
-
23
-
24
-
25
-
26
-
27
-
28
-
29
-
30
-
31
-
32
-
33
-
34
-
35
-
36
-
37
-
38
-
39
-
40
-
41
-
42
-
43
-
44
-
45
-
46
-
47
-
48
-
49
-
50
-
51
-
52
-
53
-
54
-
 55
55 -
 56
56 -
 57
57 -
 58
58 -
 59
59 -
 60
60 -
 61
61 -
 62
62 -
 63
63 -
 64
64 -
 65
65 -
66
-
67
-
68
-
69
-
70
-
71
-
72
-
73
-
74
-
75
-
76
-
77
-
78
-
79
-
80
-
81
-
82
-
83
-
84
-
85
-
86
-
87
-
88
-
89
-
90
-
91
-
92
-
93
-
94
-
95
-
96
-
97
-
98
-
99
-
100
-
101
-
102
-
103
-
104
-
105
-
106
-
107
-
108
-
109
-
110
-
111
-
112
-
113
-
114
-
115
-
116
-
117
-
118
-
119
-
120
-
121
-
122
-
123
-
124
-
125
-
126
-
127
-
128
-
129
-
130
-
131
-
132
-
133
-
134
-
135
-
136
-
137
-
138
-
139
-
140
-
141
-
142
-
143
-
144
-
145
-
146
-
147
-
148
-
149
-
150
-
151
-
152
-
153
-
154
-
155
-
156
-
157
-
158
-
159
-
160
-
161
-
162
-
163
-
164
-
165
-
166
-
167
-
168
-
169
-
170
-
171
-
172
-
173
-
174
-
175
-
176
-
177
-
178
-
179
-
180
-
181
-
182
-
183
-
184
-
185
-
186
-
187
-
188
-
189
-
190
-
191
-
192
-
193
-
194
-
195
-
196
-
197
-
198
 |
 |
