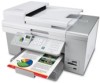
Lexmark X9350 User's Guide - Page 49
Paper Handling submenu, Print Files Mode, Print, Files Mode, Change Default Settings
 |
UPC - 734646091732
View all Lexmark X9350 manuals
Add to My Manuals
Save this manual to your list of manuals |
Page 49 highlights
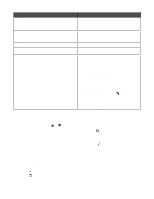
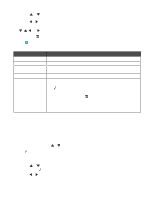
Once these conditions are met, you can: • Print Microsoft Office, Excel, or PowerPoint files which have the file name extensions of *.DOC, *.XLS or *.PPT. • Change print values to affect print jobs of the files. 1 Make sure the printer is connect to the computer with a USB cable. 2 Insert a memory card or flash drive containing files of the type specified above. 3 Wait for the printer to detect the storage device. The Print Files Mode menu appears. Press To View the Print Files Mode menu, showing a list of files on the flash drive, and select a file to print. a Press or repeatedly until you reach the file you want to print. b Press to print the file. View the Print Files Mode menu, showing more menu items which affect a print job. • The Quality menu item lets you adjust the quality of a copy. It has values of Normal, Photo, Auto, and Draft. • Press to access menu items for the Paper Handling submenu. It appears with different menu items depending on whether the optional Tray 2 is installed. See "Paper Handling submenu" on page 49 for more information. • Press to access menu items for the Change Default Settings submenu. This submenu lets you specify values you want for each of the menu items in the Print Files Mode menu. Once each value is chosen, press to save the values as default settings and exit this submenu. Menu items within Change Default Settings are: - Quality-Lets you adjust the quality of a copy. It has values of Normal, Photo, Auto, and Draft. - Paper Handling-Appears with different menu items depending on whether the optional Tray 2 is installed. See "Paper Handling submenu" on page 49 for more information. 4 Once all choices are made in the Quality, Paper Handling, or Change Default Settings menu items, press to save the values as user default settings and exit. Paper Handling submenu Use this To Size Specify the size of the paper loaded. Appears when Tray 2 is not installed. Type Specify the type of paper loaded. Appears when Tray 2 is not installed. Size - Tray 1 Specify the size of the paper loaded in Tray 1. Appears when Tray 2 is installed. 1 Menu item appears only when the optional Tray 2 is installed. 49
-
 1
1 -
2
-
3
-
4
-
5
-
6
-
7
-
8
-
9
-
10
-
11
-
12
-
13
-
14
-
15
-
16
-
17
-
18
-
19
-
20
-
21
-
22
-
23
-
24
-
25
-
26
-
27
-
28
-
29
-
30
-
31
-
32
-
33
-
34
-
35
-
36
-
37
-
38
-
39
-
40
-
41
-
42
-
43
-
 44
44 -
 45
45 -
 46
46 -
 47
47 -
 48
48 -
 49
49 -
 50
50 -
 51
51 -
 52
52 -
 53
53 -
 54
54 -
55
-
56
-
57
-
58
-
59
-
60
-
61
-
62
-
63
-
64
-
65
-
66
-
67
-
68
-
69
-
70
-
71
-
72
-
73
-
74
-
75
-
76
-
77
-
78
-
79
-
80
-
81
-
82
-
83
-
84
-
85
-
86
-
87
-
88
-
89
-
90
-
91
-
92
-
93
-
94
-
95
-
96
-
97
-
98
-
99
-
100
-
101
-
102
-
103
-
104
-
105
-
106
-
107
-
108
-
109
-
110
-
111
-
112
-
113
-
114
-
115
-
116
-
117
-
118
-
119
-
120
-
121
-
122
-
123
-
124
-
125
-
126
-
127
-
128
-
129
-
130
-
131
-
132
-
133
-
134
-
135
-
136
-
137
-
138
-
139
-
140
-
141
-
142
-
143
-
144
-
145
-
146
-
147
-
148
-
149
-
150
-
151
-
152
-
153
-
154
-
155
-
156
-
157
-
158
-
159
-
160
-
161
-
162
-
163
-
164
-
165
-
166
-
167
-
168
-
169
-
170
-
171
-
172
-
173
-
174
-
175
-
176
-
177
-
178
-
179
-
180
-
181
-
182
-
183
-
184
-
185
-
186
-
187
-
188
-
189
-
190
-
191
-
192
-
193
-
194
-
195
-
196
-
197
-
198
 |
 |
