Linksys WPS54GU2 User Guide - Page 12
Connecting the PrintServer - power supply
 |
UPC - 745883557806
View all Linksys WPS54GU2 manuals
Add to My Manuals
Save this manual to your list of manuals |
Page 12 highlights
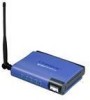
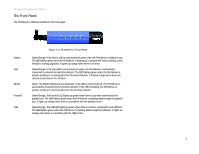
Wireless-G PrintServer for USB 2.0 Chapter 3: Connecting the PrintServer Overview Before starting the physical installation, make a note of the PrintServer's Default Name, which is located on the bottom of the PrintServer. There is a bar code sticker with an LK number printed on it (for example, LK71107). This number is used during the PrintServer driver installation. Connecting the PrintServer to Your Network 1. Plug one end of the Ethernet network cable into the PrintServer's LAN port. (See Figure 3-1.) 2. Connect the other end of the cable to your networked hub, switch, or router. The distance between the PrintServer and the other device should not exceed 328 feet (100 meters). 3. Use the USB cable to connect your USB printer to the PrintServer's USB port. Plug the Type A connector end into the PrintServer (Figure 3-2) and the Type B connector end into the printer. 4. Use the parallel printer cable to connect your parallel printer to the PrintServer's parallel port. Plug one end of the cable into the PrintServer (Figure 3-3) and the other end into the printer. 5. Power on your printer. 6. Plug the power adapter into the PrintServer's Power port. (See Figure 3-4.) 7. Plug the power adapter into an electrical outlet. IMPORTANT: Make sure you use the power adapter supplied with the PrintServer. Use of a different power adapter could damage the PrintServer. NOTE: The PrintServer does not have an on/off power switch. Whenever its power adapter is plugged into a power supply, the PrintServer is powered on. The PrintServer can be powered on before, during, or after your network is powered on. Figure 3-1: Connecting to the LAN Port Figure 3-2: Connecting to the USB Port Figure 3-3: Connecting to the Parallel Port Chapter 3: Connecting the PrintServer Overview Figure 3-4: Connecting to the Power Port 5
-
 1
1 -
2
-
3
-
4
-
5
-
6
-
 7
7 -
 8
8 -
 9
9 -
 10
10 -
 11
11 -
 12
12 -
 13
13 -
 14
14 -
 15
15 -
 16
16 -
 17
17 -
18
-
19
-
20
-
21
-
22
-
23
-
24
-
25
-
26
-
27
-
28
-
29
-
30
-
31
-
32
-
33
-
34
-
35
-
36
-
37
-
38
-
39
-
40
-
41
-
42
-
43
-
44
-
45
-
46
-
47
-
48
-
49
-
50
-
51
-
52
-
53
-
54
-
55
-
56
-
57
-
58
-
59
-
60
-
61
-
62
-
63
-
64
-
65
-
66
-
67
-
68
-
69
-
70
-
71
-
72
-
73
-
74
-
75
-
76
 |
 |
