Linksys WPS54GU2 User Guide - Page 25
Configuring the PrintServer Using the, Web-based Utility - ip address
 |
UPC - 745883557806
View all Linksys WPS54GU2 manuals
Add to My Manuals
Save this manual to your list of manuals |
Page 25 highlights
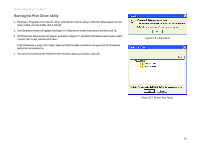
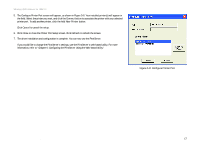
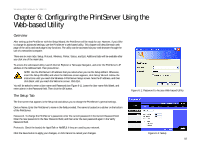
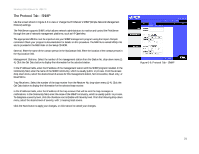
Wireless-G PrintServer for USB 2.0 Chapter 6: Configuring the PrintServer Using the Web-based Utility Overview After setting up the PrintServer with the Setup Wizard, the PrintServer will be ready for use. However, if you'd like to change its advanced settings, use the PrintServer's web-based utility. This chapter will describe each web page of the utility and each page's key functions. The utility can be accessed via your web browser through the use of a networked computer. There are six main tabs: Setup, Protocol, Wireless, Printer, Status, and Exit. Additional tabs will be available after you click one of the main tabs. To access the web-based utility, launch Internet Explorer or Netscape Navigator, and enter the PrintServer's IP address in the Address field. Then press Enter. NOTE: Use the PrintServer's IP address that you noted when you ran the Setup Wizard. Otherwise, insert the Setup CD-ROM, and when the Welcome screen appears, click Setup Wizard. Follow the instructions until you reach the Wireless-G PrintServer Setup screen. Note the IP address, and then click Back until you reach the Welcome screen. Click Exit. You will be asked to enter a User name and Password (see Figure 6-1). Leave the User name field blank, and enter admin in the Password field. Then click the OK button. The Setup Tab The first screen that appears is the Setup tab and allows you to change the PrintServer's general settings. Device Name. Enter the PrintServer's name in the field provided. The name is located on a sticker on the bottom of the PrintServer. Password. To change the PrintServer's password, enter the current password in the Current Password field. Enter the new password in the New Password field, and then enter the new password again in the Verify Password field. Protocols. Check the box(es) for AppleTalk or NetBEUI, if they are used by your network. Click the Save button to apply your changes, or click Cancel to cancel your changes. Chapter 6: Configuring the PrintServer Using the Web-based Utility Overview Figure 6-1: Password to Access Web-based Utility Figure 6-2: Setup 18
-
 1
1 -
2
-
3
-
4
-
5
-
6
-
7
-
8
-
9
-
10
-
11
-
12
-
13
-
14
-
15
-
16
-
17
-
18
-
19
-
 20
20 -
 21
21 -
 22
22 -
 23
23 -
 24
24 -
 25
25 -
 26
26 -
 27
27 -
 28
28 -
 29
29 -
 30
30 -
31
-
32
-
33
-
34
-
35
-
36
-
37
-
38
-
39
-
40
-
41
-
42
-
43
-
44
-
45
-
46
-
47
-
48
-
49
-
50
-
51
-
52
-
53
-
54
-
55
-
56
-
57
-
58
-
59
-
60
-
61
-
62
-
63
-
64
-
65
-
66
-
67
-
68
-
69
-
70
-
71
-
72
-
73
-
74
-
75
-
76
 |
 |